

Before you start
PostQueen checks all eight scopes when a channel connects. A missing one stops the connect.
Create the client
1
Create or pick a project
In the Google Cloud console, create a project for PostQueen or select the one you use.
2
Turn on the YouTube APIs
Open APIs and services > Enabled APIs and services and choose Enable APIs and services. Search for and enable YouTube Data API v3 (uploads, thumbnails, channel details) and YouTube Analytics API (the numbers on the Analytics page). PostQueen does not use the YouTube Reporting API.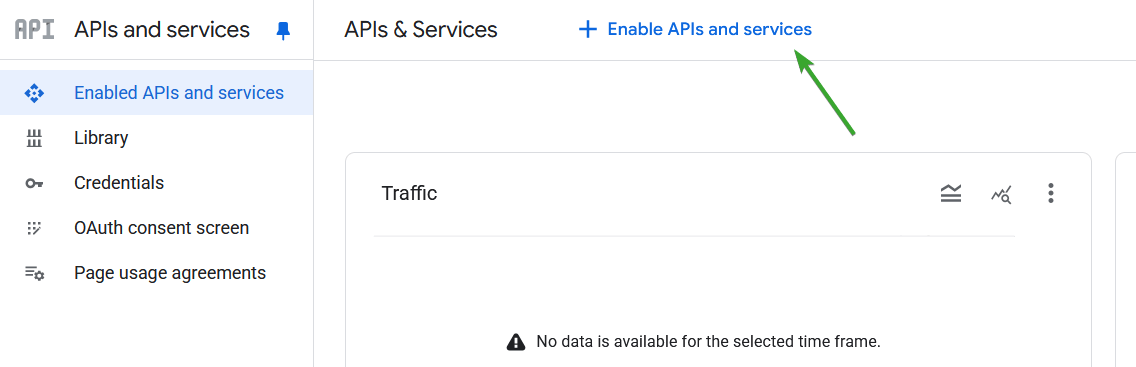
3
Set up Branding and Audience
Open Google Auth Platform. In Branding, enter the app name, a support email, your home page, privacy policy and terms links, and your domain under Authorized domains. In Audience, choose External, unless everyone who will sign in belongs to your Google Workspace, where Internal skips verification.While the app is in Testing, only the accounts under Test users can sign in or connect a channel. Add your own Google account there with Add users.
4
Add the scopes
In Data access, choose Add or remove scopes and add all eight, then save:
5
Create a Web application client
In Clients, choose Create client and pick Web application as the application type.The redirect URI is where the network sends the browser back after someone approves PostQueen. It is
your Google accepts only
FRONTEND_URL + /integrations/social/ + the network’s identifier, for example
https://postqueen.example.com/integrations/social/pinterest.Most networks need exactly one URI, with no trailing slash. Two exceptions: TikTok Business needs
the trailing slash (/integrations/social/tiktok-business/), and a Google web client that also
serves Google Business Profile lists both /integrations/social/youtube and
/integrations/social/gmb. Channel developer apps lists every
network’s ending.Under Authorized JavaScript origins, add your FRONTEND_URL with no path. Under Authorized redirect URIs, add:https, except for localhost. If this client also serves Google Business Profile, add the same addresses ending in /integrations/social/gmb: see Google My Business setup.6
Copy the client ID and secret
Choose Create and copy the Client ID and Client secret from the dialog. Google shows the secret only now: afterwards the console keeps just its last four characters. If you lose it, add a new secret to the same client rather than creating another client.
Set the variables
Add the two keys to your environment:docker restart or
docker compose restart keeps the old container and its old environment.
In the folder that holds docker-compose.yaml, recreate only the postqueen service:
docker compose down for a settings change: on
a host that runs other Compose services in the same project, it stops them too.
Then open PostQueen, go to Channels, choose Add Channel and pick this network. You are
sent to its login to authorize PostQueen, and the channel appears in the Channels list once you
accept.
The channel is in the Channels list with its avatar and name.
Add Channel does not check whether your variables are set. A missing or misspelled key shows
up as a broken authorization page on the network’s side rather than a helpful message in
PostQueen, so if the login page itself looks wrong, check the keys before anything else.
App review
Two Google processes stand between a new client and everyone’s public uploads:1
Publish the app and verify the scopes
In Audience, choose Publish app to leave Testing. Continue with Google then works for any Google account, because it asks only for the basic profile scopes. The YouTube scopes are sensitive: until Google verifies them in the Verification Center (a justification for each scope and a demo video), people who connect a channel see Google’s unverified-app screen, and at most 100 accounts can use them.
2
Pass the YouTube API audit
YouTube keeps every video uploaded through an unverified API project created after July 28, 2020 private, whatever visibility the post asks for. A project can also upload only 100 videos a day by default, shared by every channel on your install. Request the audit and more quota with the YouTube API Services Audit and Quota Extension Form.
Troubleshooting
redirect_uri_mismatch on Google's screen
redirect_uri_mismatch on Google's screen
The redirect URI PostQueen sent is not in Authorized redirect URIs. Add it exactly as in step 5, with the scheme and port your
FRONTEND_URL uses and no trailing slash.Not enough scopes, when choosing a provider, please add all the scopes
Not enough scopes, when choosing a provider, please add all the scopes
A scope is missing from Data access, or was declined on the consent screen. Add all eight, then connect again and approve everything.
Access blocked or access denied on Google's screen
Access blocked or access denied on Google's screen
The app is in Testing and the account is not a test user. Add it under Audience > Test users, or publish the app.
The sign-in page keeps loading after Google's consent screen
The sign-in page keeps loading after Google's consent screen
The client secret in your environment is wrong: Google shows the consent screen with the client ID alone, then refuses the token exchange with
invalid_client. Add a new secret to the client, put it in YOUTUBE_CLIENT_SECRET and restart PostQueen.A Google Workspace account cannot connect
A Google Workspace account cannot connect
Your Workspace admin restricts third-party apps. In the Google Admin console, open Security > Access and data control > API controls > Manage App Access, choose Configure new app, find the app by its client ID and set it to Trusted. Google says the change can take up to 24 hours.
Every upload is private
Every upload is private
Your project has not passed the YouTube API audit. Request it with the form in step 2 of App review.