> ## Documentation Index
> Fetch the complete documentation index at: https://docs.postqueen.ai/llms.txt
> Use this file to discover all available pages before exploring further.
# Instagram setup
> Register the Instagram application and give PostQueen its keys
On your own instance the Meta app is yours: register it in Meta for Developers, then put its keys in your environment.
**NOTE:** Please be advised that Instagram and Facebook can use the same app (no need to create two separate apps)
There are two ways to connect to an Instagram account: by using a Facebook Business or through a standalone flow that connects directly to an Instagram account. Both methods will require a [Meta for Developers account](https://developers.facebook.com/apps/).
## Setting up Meta Application
The following steps will guide you through the setup of a Meta application that can be used for connecting Instagram to PostQueen.
Select a business portfolio, then create a [new app in Meta for developers](https://developers.facebook.com/apps/creation/).
Please be advised that for public applications, you will need to verify your business.
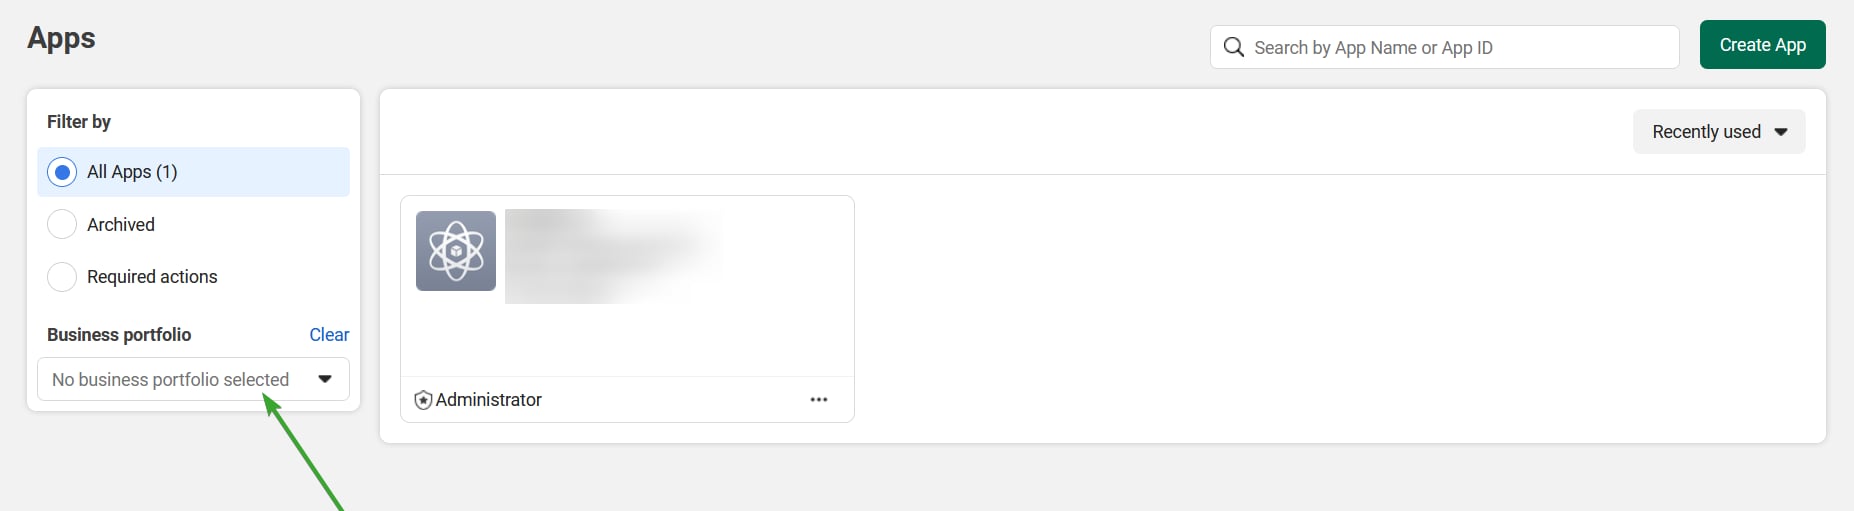
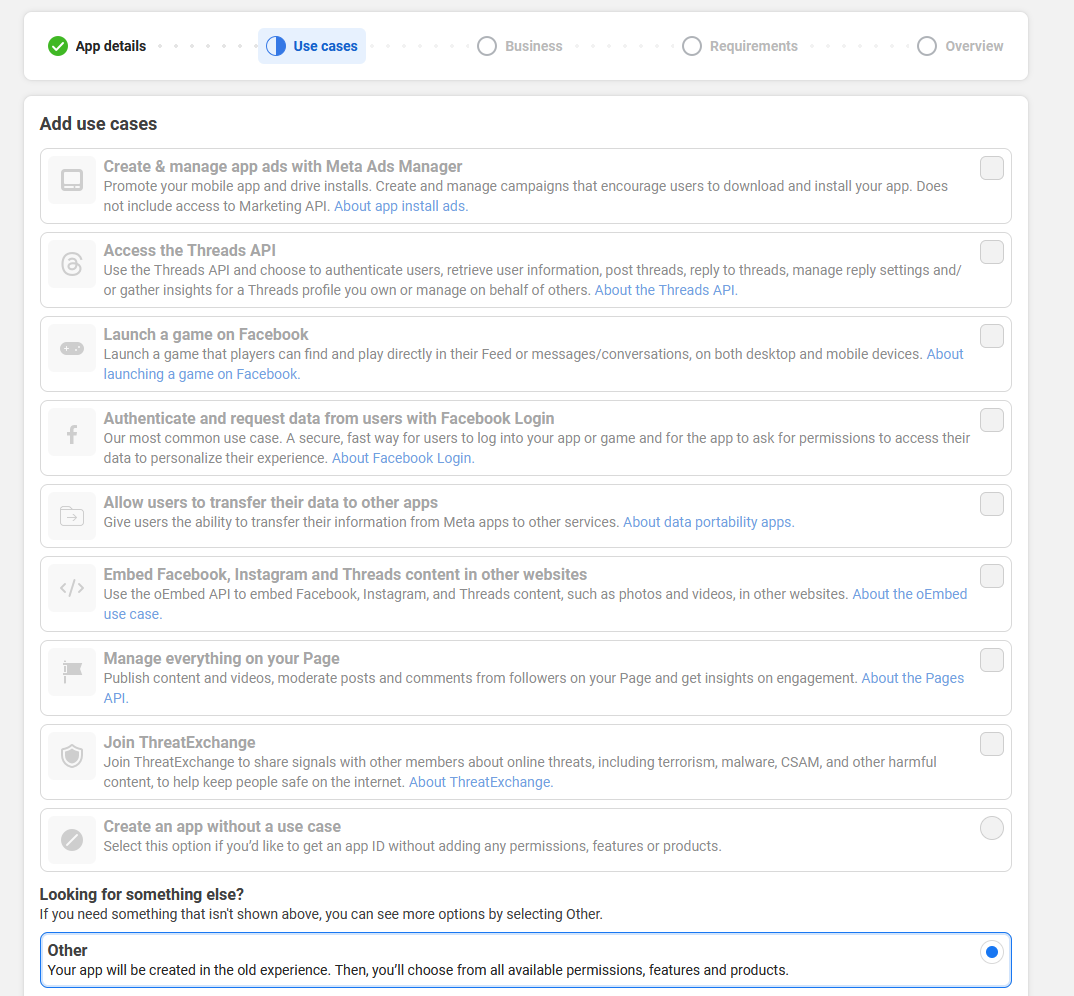
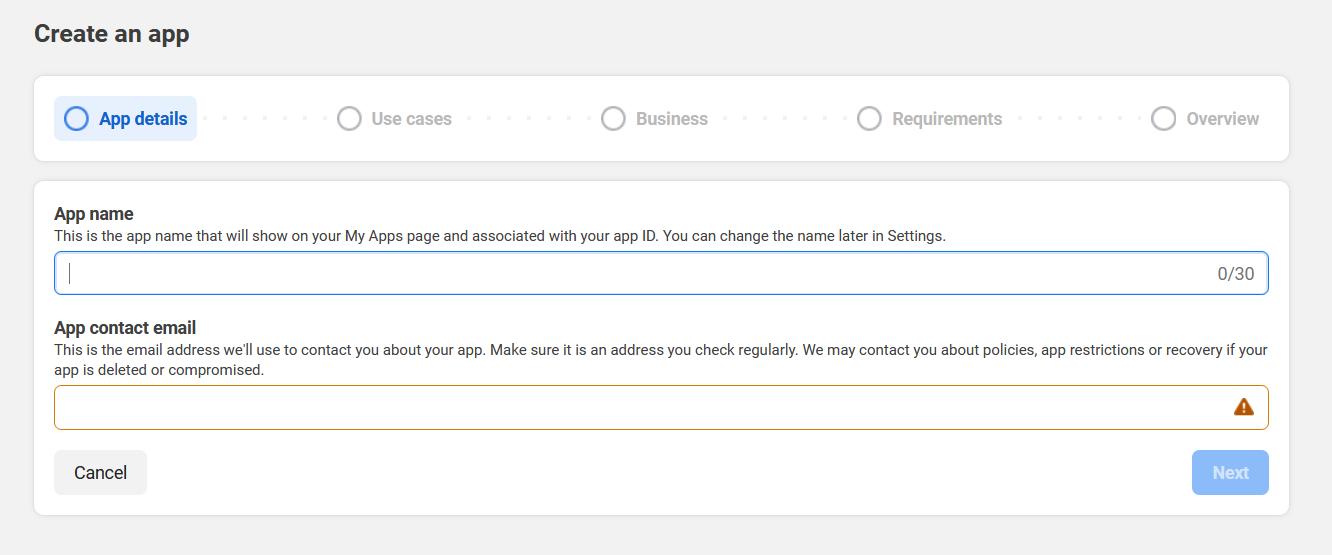 Select "Other" and click next
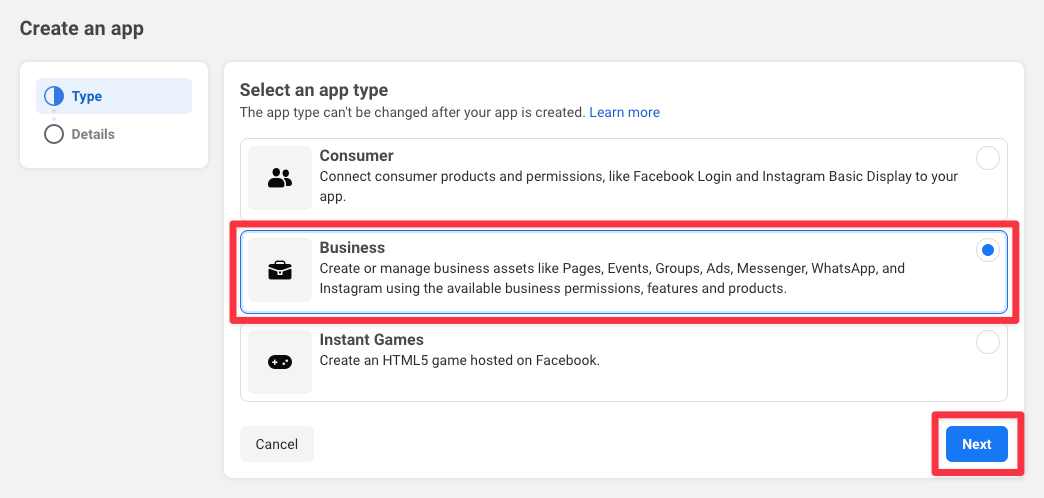
 Then select business
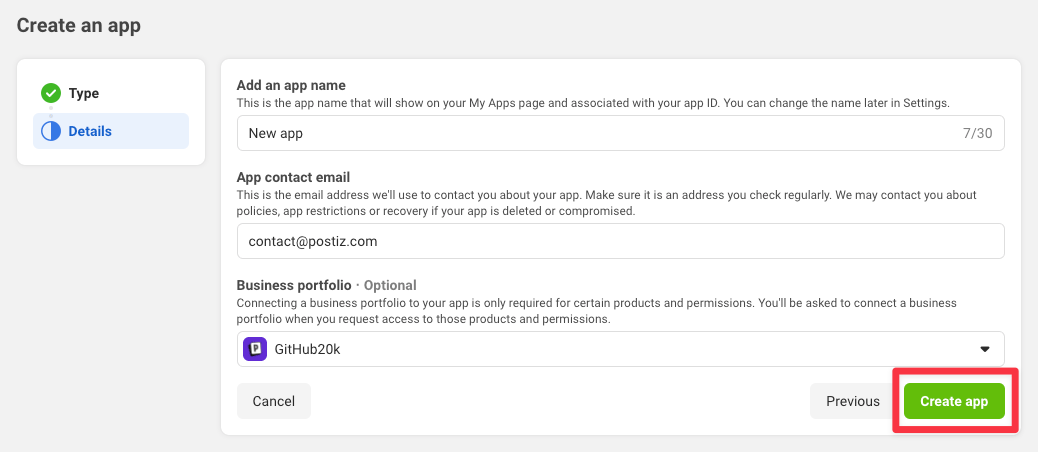
 Add all your details and click Create App
 ## Facebook Business Option
If you have a Facebook Business page that is linked to your Instagram account, you can connect to it by setting up the Login for Business flow.
## Facebook Business Option
If you have a Facebook Business page that is linked to your Instagram account, you can connect to it by setting up the Login for Business flow.
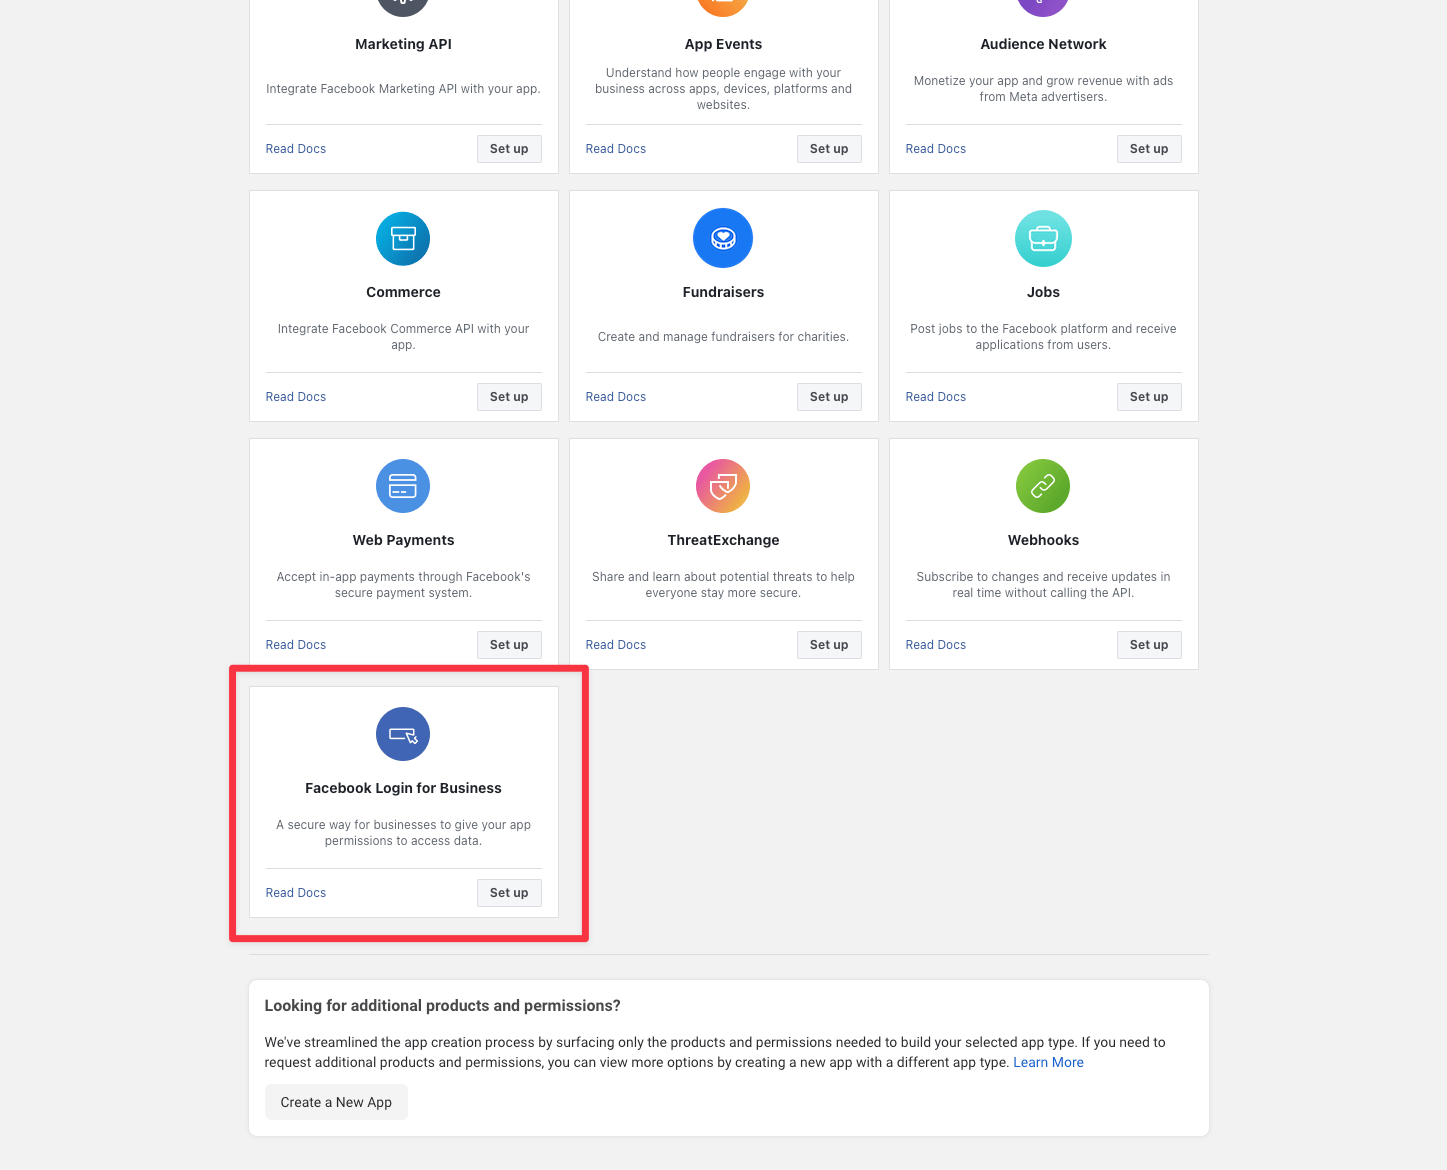 Set up login for business
Set up a redirect URI back to the application
Set up login for business
Set up a redirect URI back to the application
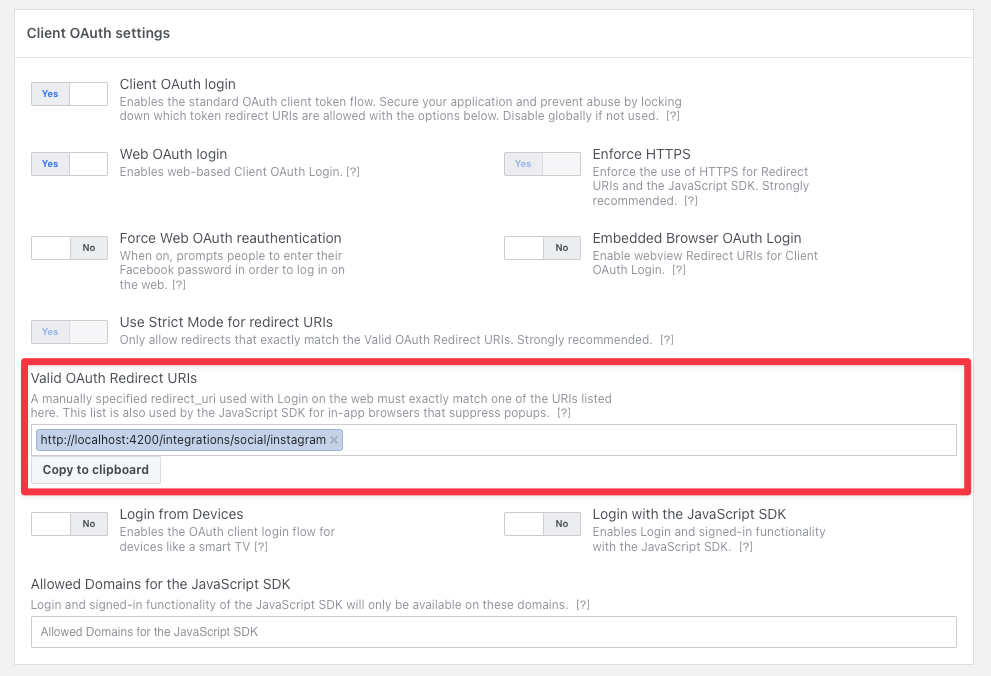 **Your Instagram OAuth2 Redirect URI:**
* Production: `https://postqueen.example.com/integrations/social/instagram`
* Local development: `http://localhost:4200/integrations/social/instagram`
* Docker: `http://localhost:4007/integrations/social/instagram`
**Your Instagram OAuth2 Redirect URI:**
* Production: `https://postqueen.example.com/integrations/social/instagram`
* Local development: `http://localhost:4200/integrations/social/instagram`
* Docker: `http://localhost:4007/integrations/social/instagram`
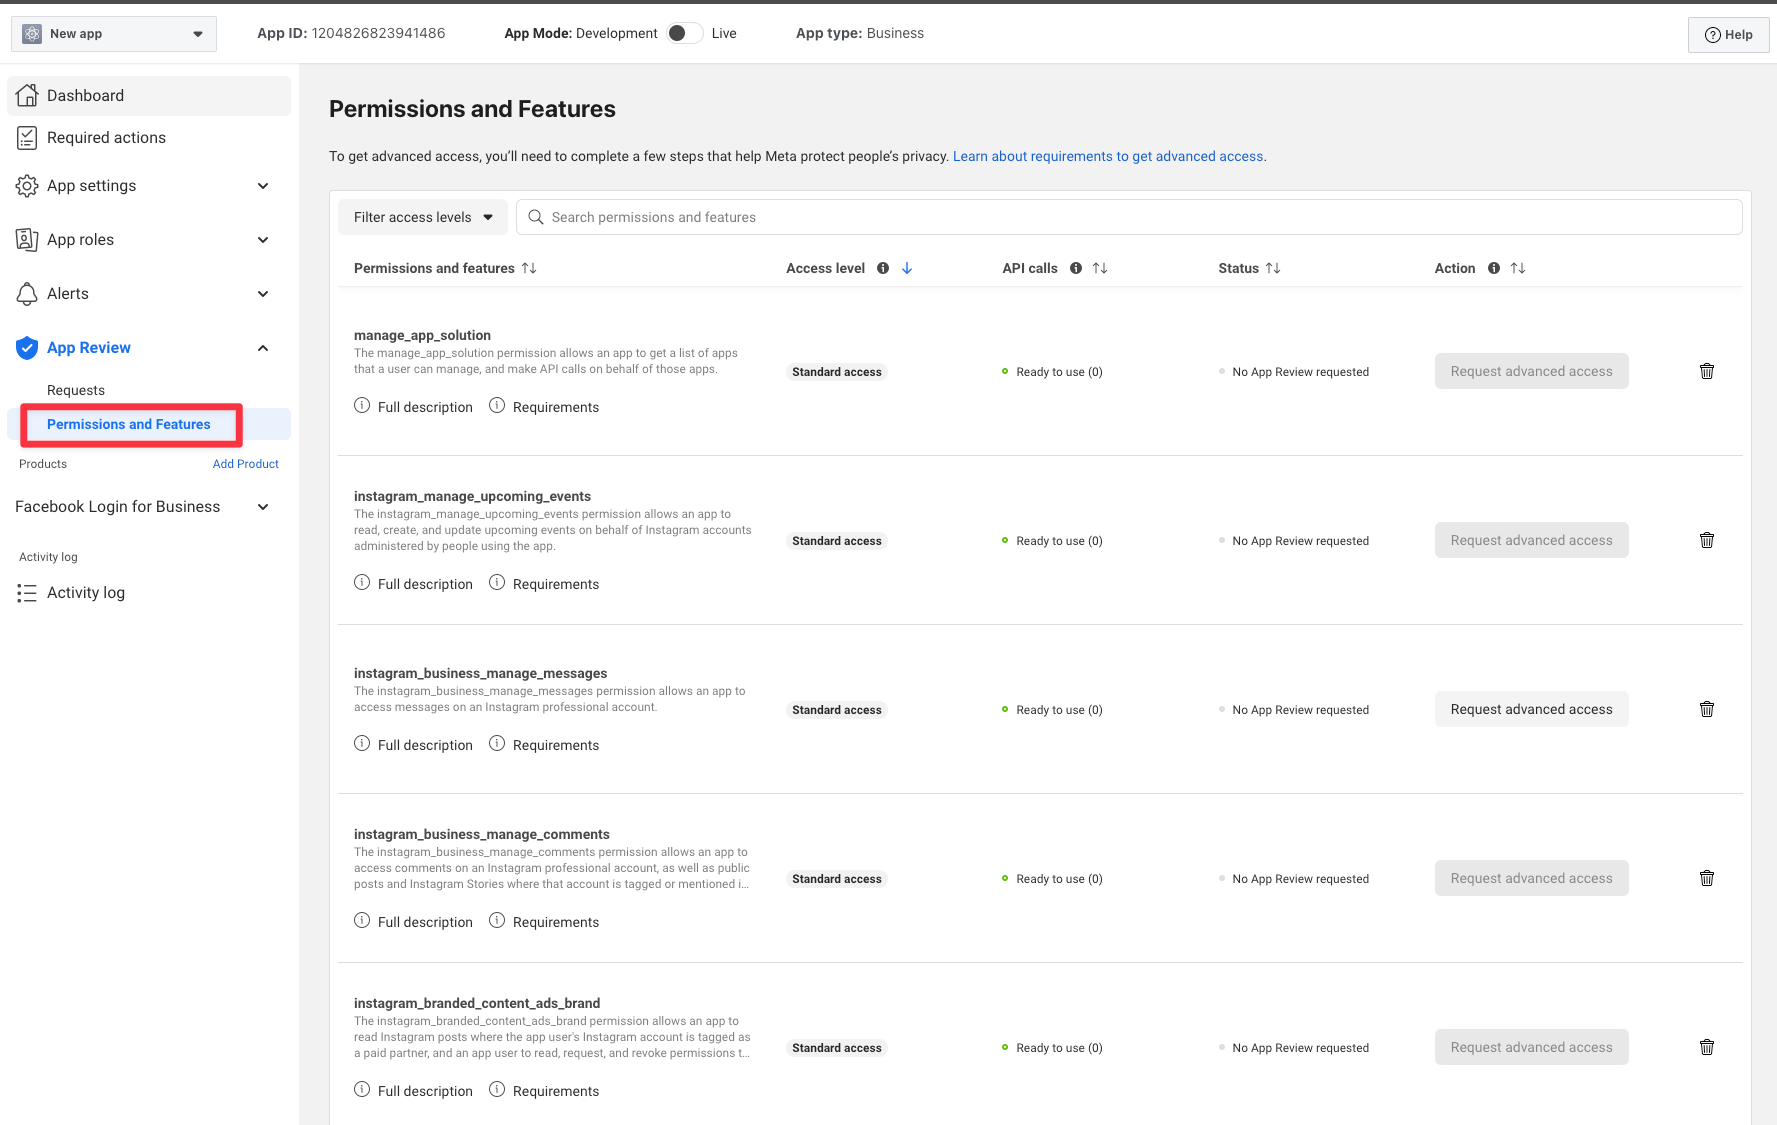 Go to advanced permission and request access for the following scopes:
* `instagram_basic`
* `pages_show_list`
* `pages_read_engagement`
* `business_management`
* `instagram_content_publish`
* `instagram_manage_comments`
* `instagram_manage_insights`
Go to advanced permission and request access for the following scopes:
* `instagram_basic`
* `pages_show_list`
* `pages_read_engagement`
* `business_management`
* `instagram_content_publish`
* `instagram_manage_comments`
* `instagram_manage_insights`
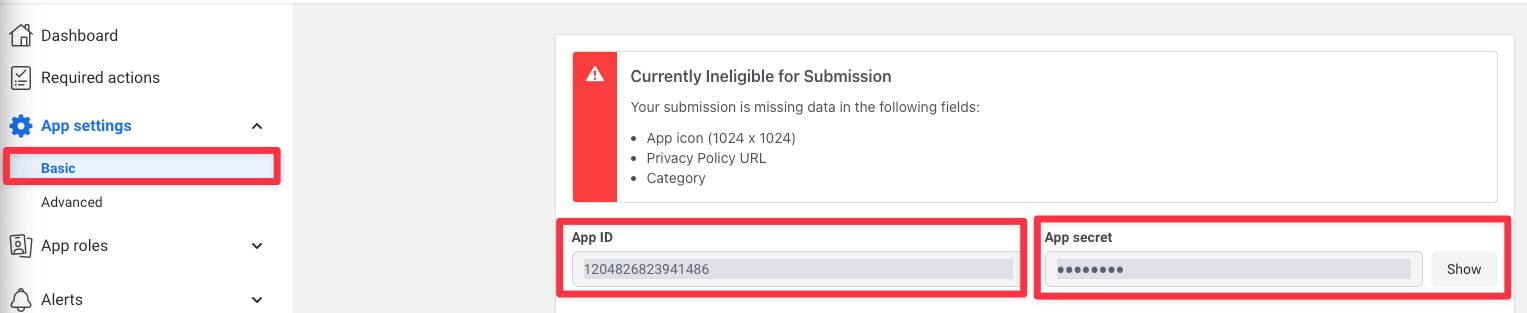 Go to basic permissions copy your App ID and App Secret and paste them in your `.env` file
```env theme={"system"}
FACEBOOK_APP_ID="app id"
FACEBOOK_APP_SECRET="app secret"
```
Instagram should now be working!
## Instagram Standalone Option
If you want to connect directly to your Instagram account without having to use a Facebook Business, use the standalone option.
Please note that standalone option requires a professional Instagram account.
The permissions are not the ones listed above. Instagram asks for its own four here:
* `instagram_business_basic`
* `instagram_business_content_publish`
* `instagram_business_manage_comments`
* `instagram_business_manage_insights`
Go to basic permissions copy your App ID and App Secret and paste them in your `.env` file
```env theme={"system"}
FACEBOOK_APP_ID="app id"
FACEBOOK_APP_SECRET="app secret"
```
Instagram should now be working!
## Instagram Standalone Option
If you want to connect directly to your Instagram account without having to use a Facebook Business, use the standalone option.
Please note that standalone option requires a professional Instagram account.
The permissions are not the ones listed above. Instagram asks for its own four here:
* `instagram_business_basic`
* `instagram_business_content_publish`
* `instagram_business_manage_comments`
* `instagram_business_manage_insights`
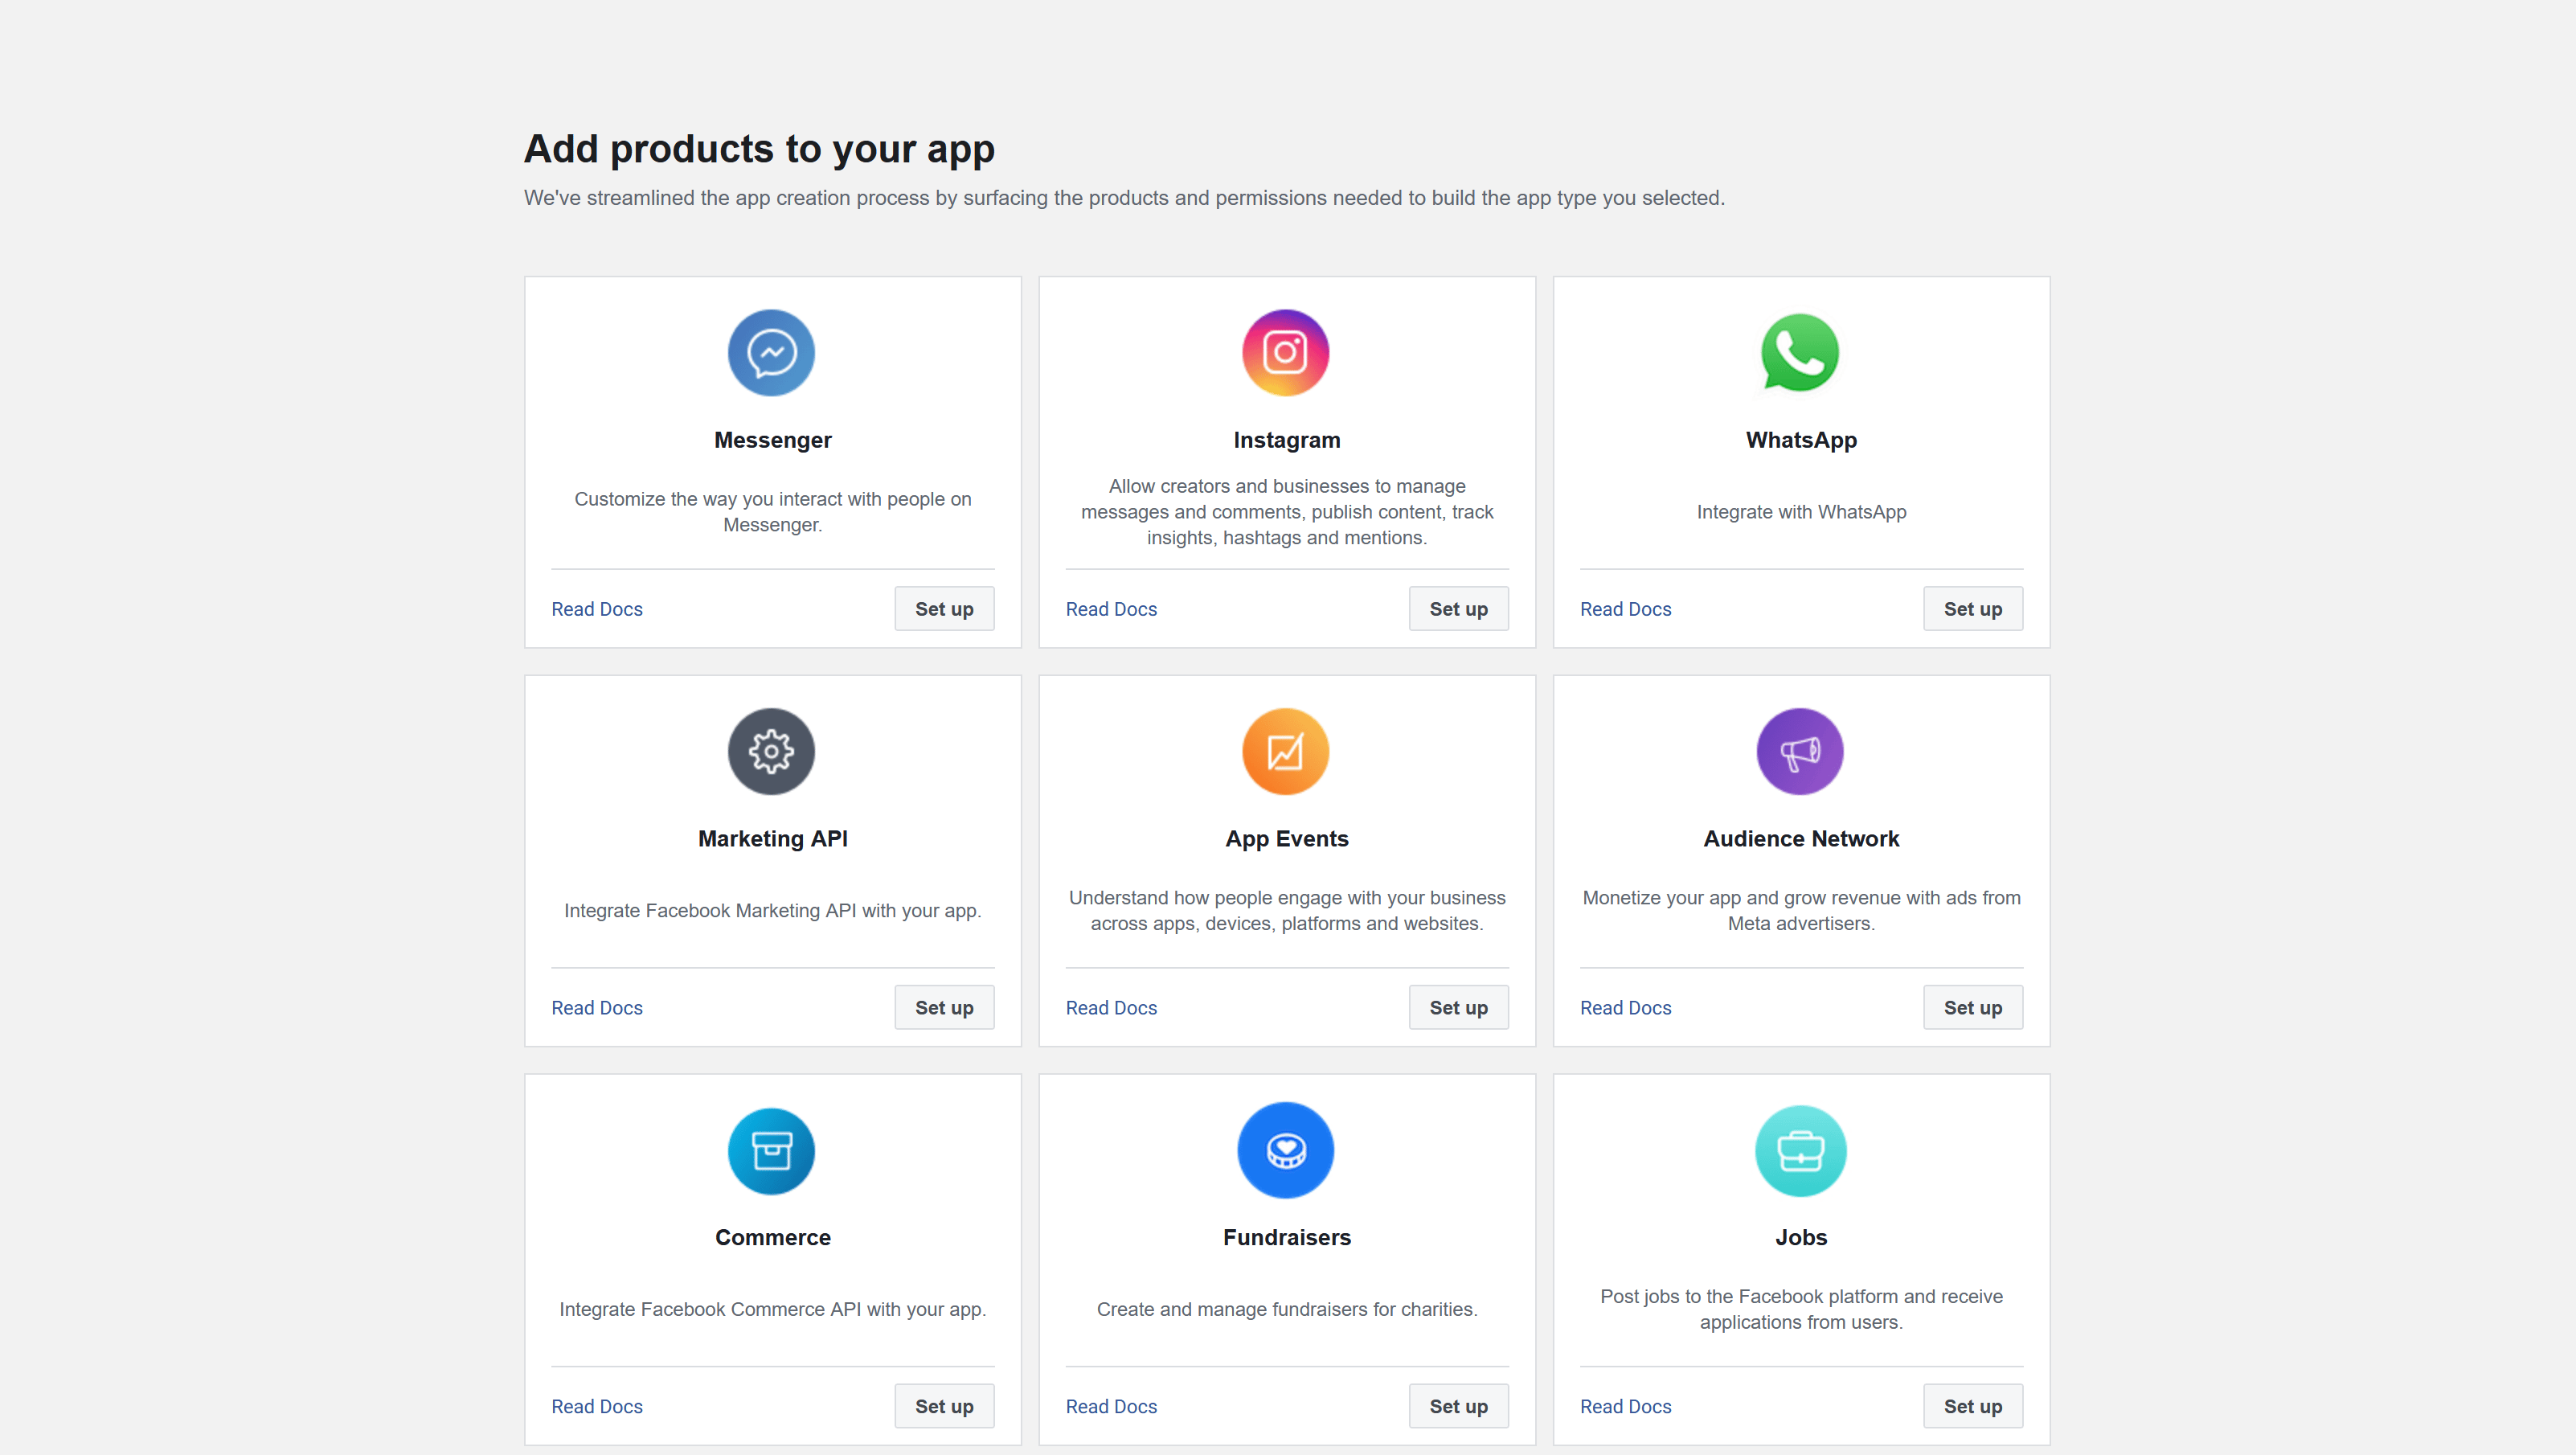 Set up Instagram.
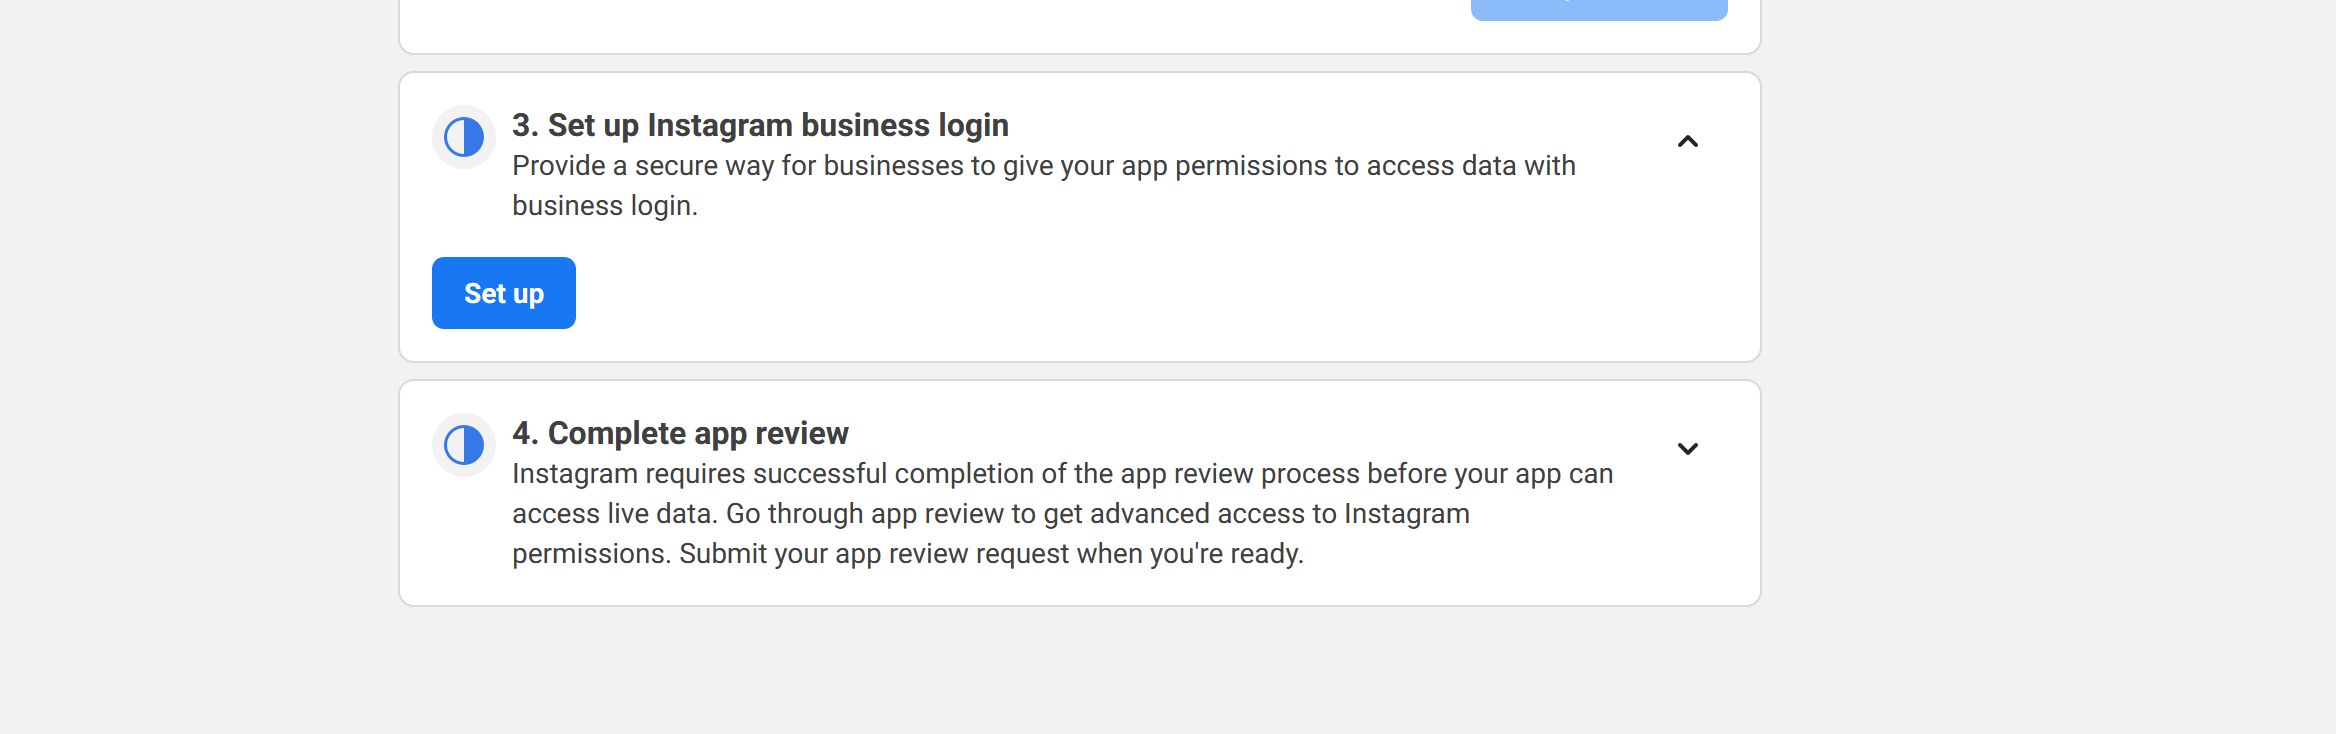 Click on the button to set up Instagram Business Login
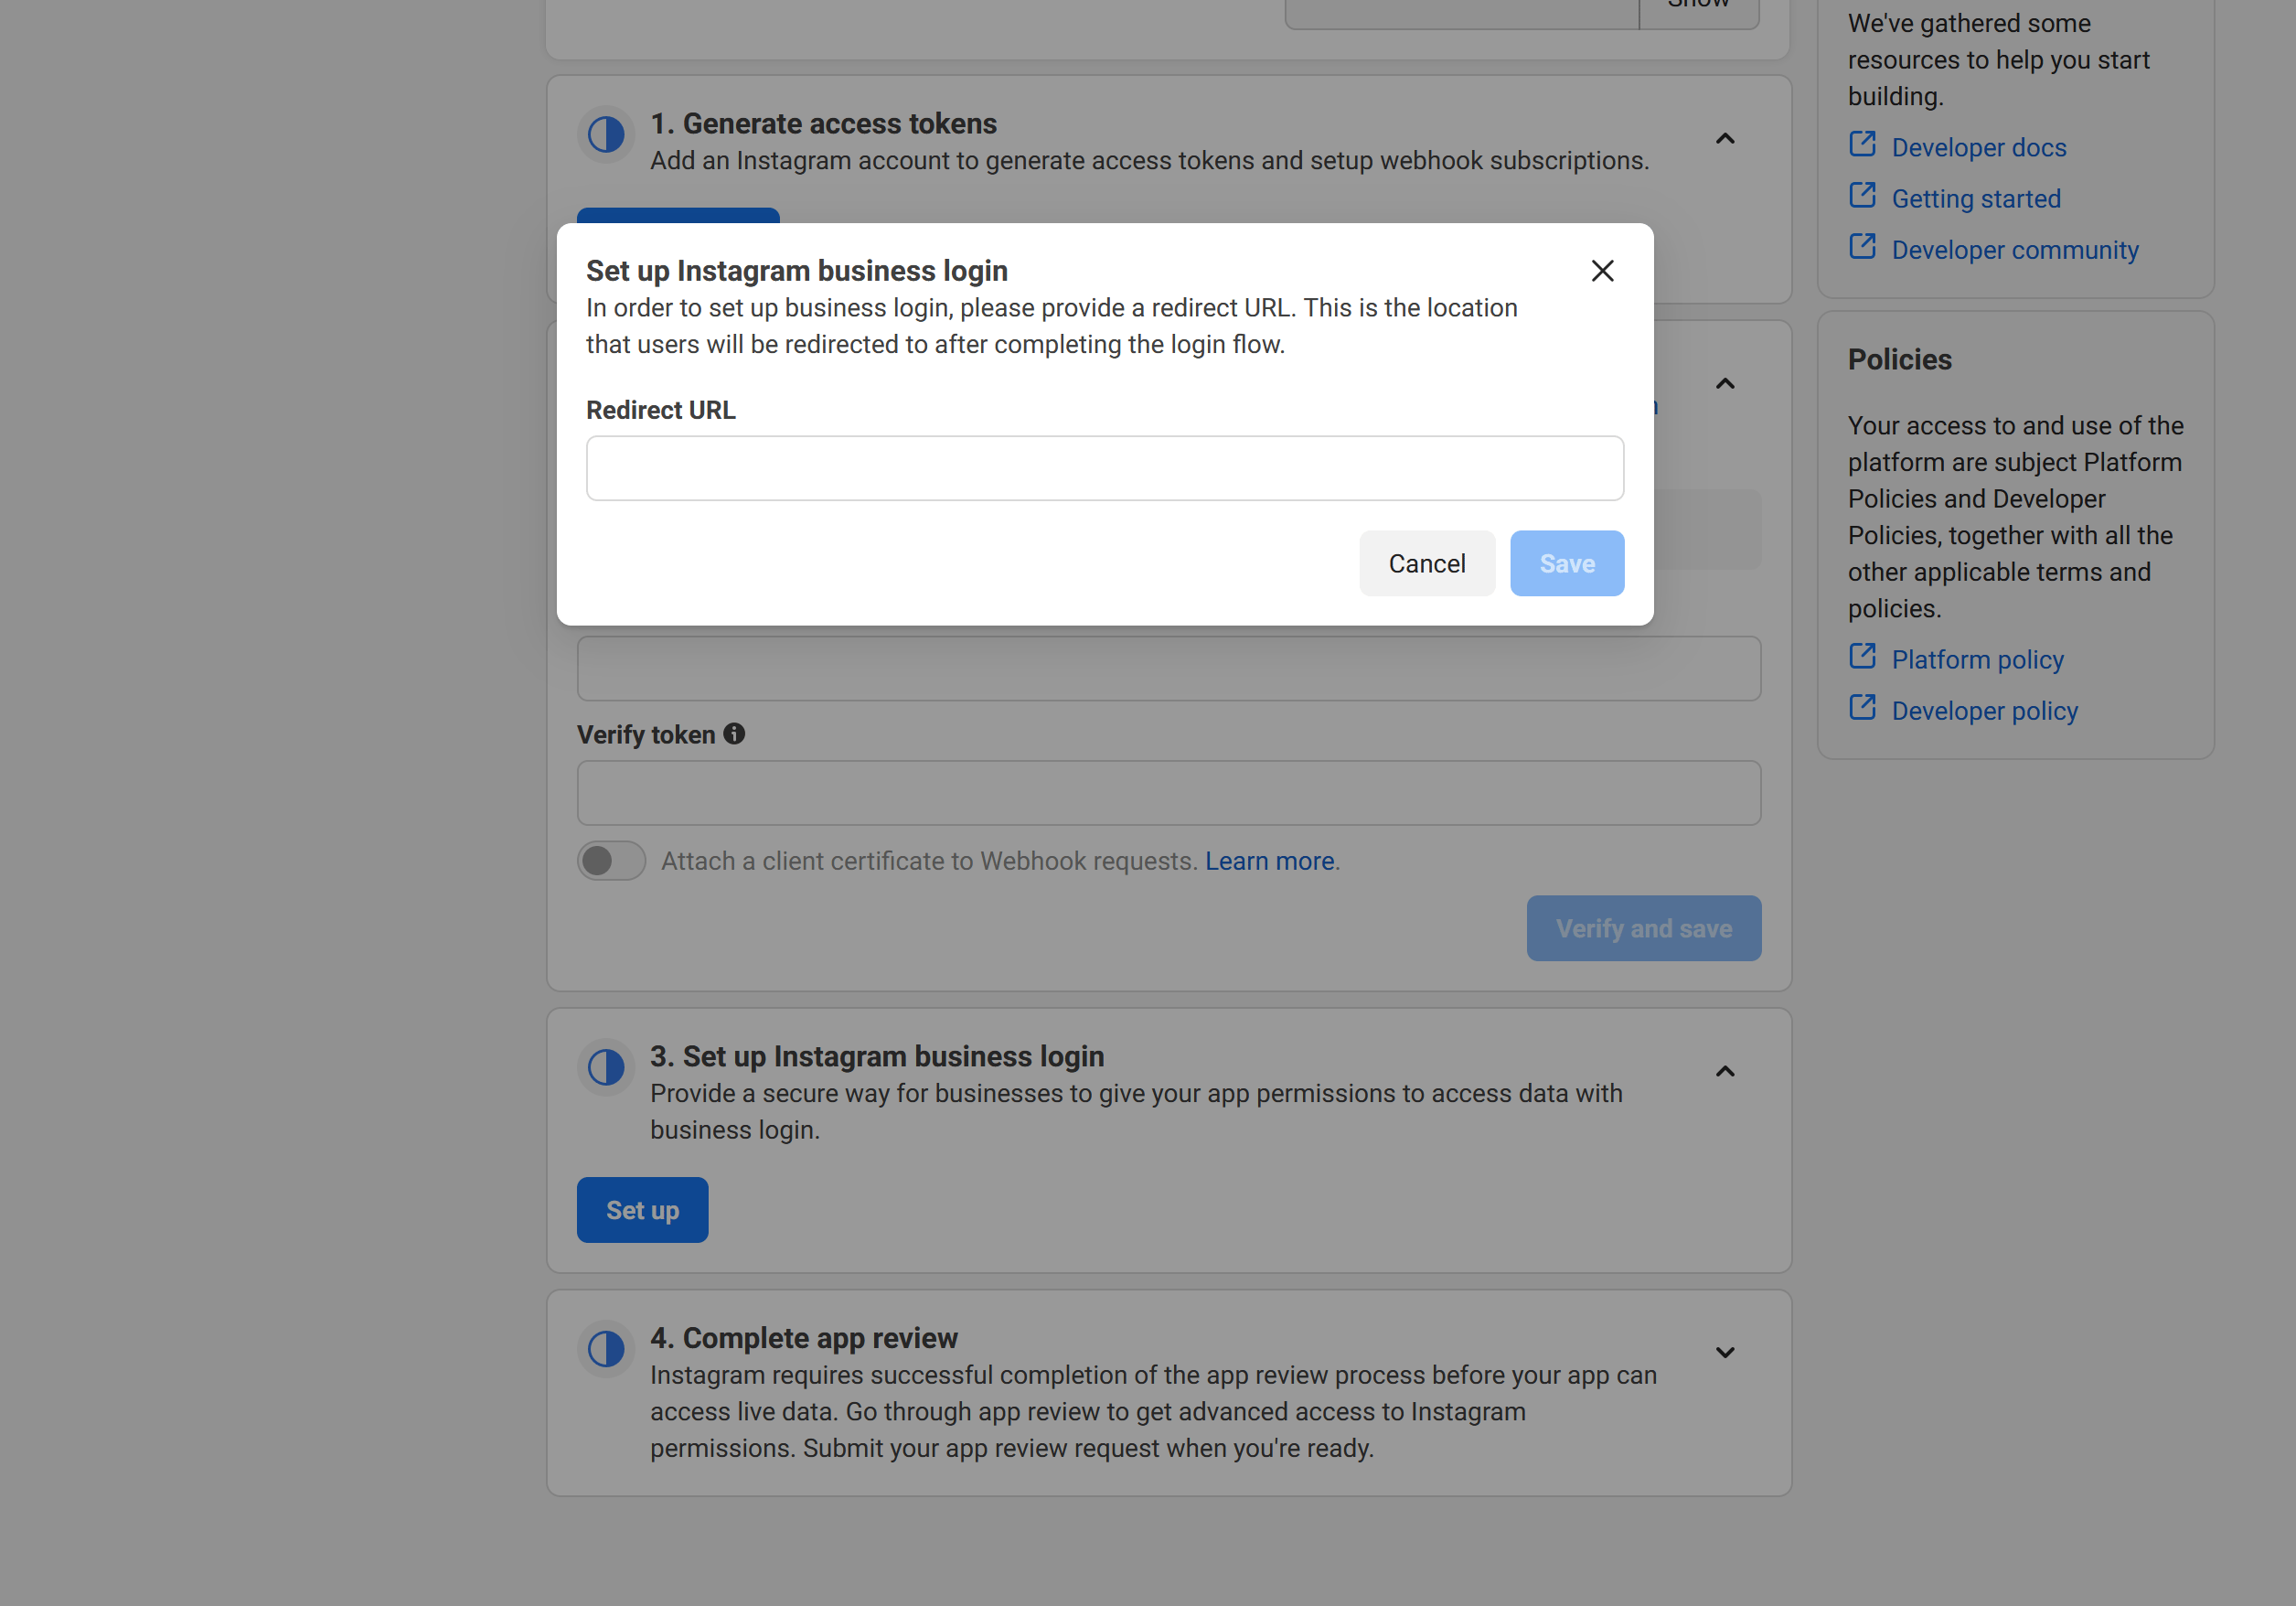 **Your Instagram Standalone OAuth2 Redirect URI:**
* Production: `https://postqueen.example.com/integrations/social/instagram-standalone`
* Local development: `https://redirectmeto.com/http://localhost:4200/integrations/social/instagram-standalone`
* Docker: `https://redirectmeto.com/http://localhost:4007/integrations/social/instagram-standalone`
Instagram will not send a visitor back to a plain `http` address, so when your `FRONTEND_URL` is not `https` she wraps the callback through `redirectmeto.com` on its way home. That wrapped address is the literal string she sends to Instagram, which makes it the one you register. Local development and Docker both fall into this case. Register the bare `localhost` URI instead and the login stops on Instagram with a redirect mismatch.
The Facebook Business flow above does not do this. It sends your `FRONTEND_URL` through unchanged, so those redirect URIs stay bare.
**Your Instagram Standalone OAuth2 Redirect URI:**
* Production: `https://postqueen.example.com/integrations/social/instagram-standalone`
* Local development: `https://redirectmeto.com/http://localhost:4200/integrations/social/instagram-standalone`
* Docker: `https://redirectmeto.com/http://localhost:4007/integrations/social/instagram-standalone`
Instagram will not send a visitor back to a plain `http` address, so when your `FRONTEND_URL` is not `https` she wraps the callback through `redirectmeto.com` on its way home. That wrapped address is the literal string she sends to Instagram, which makes it the one you register. Local development and Docker both fall into this case. Register the bare `localhost` URI instead and the login stops on Instagram with a redirect mismatch.
The Facebook Business flow above does not do this. It sends your `FRONTEND_URL` through unchanged, so those redirect URIs stay bare.
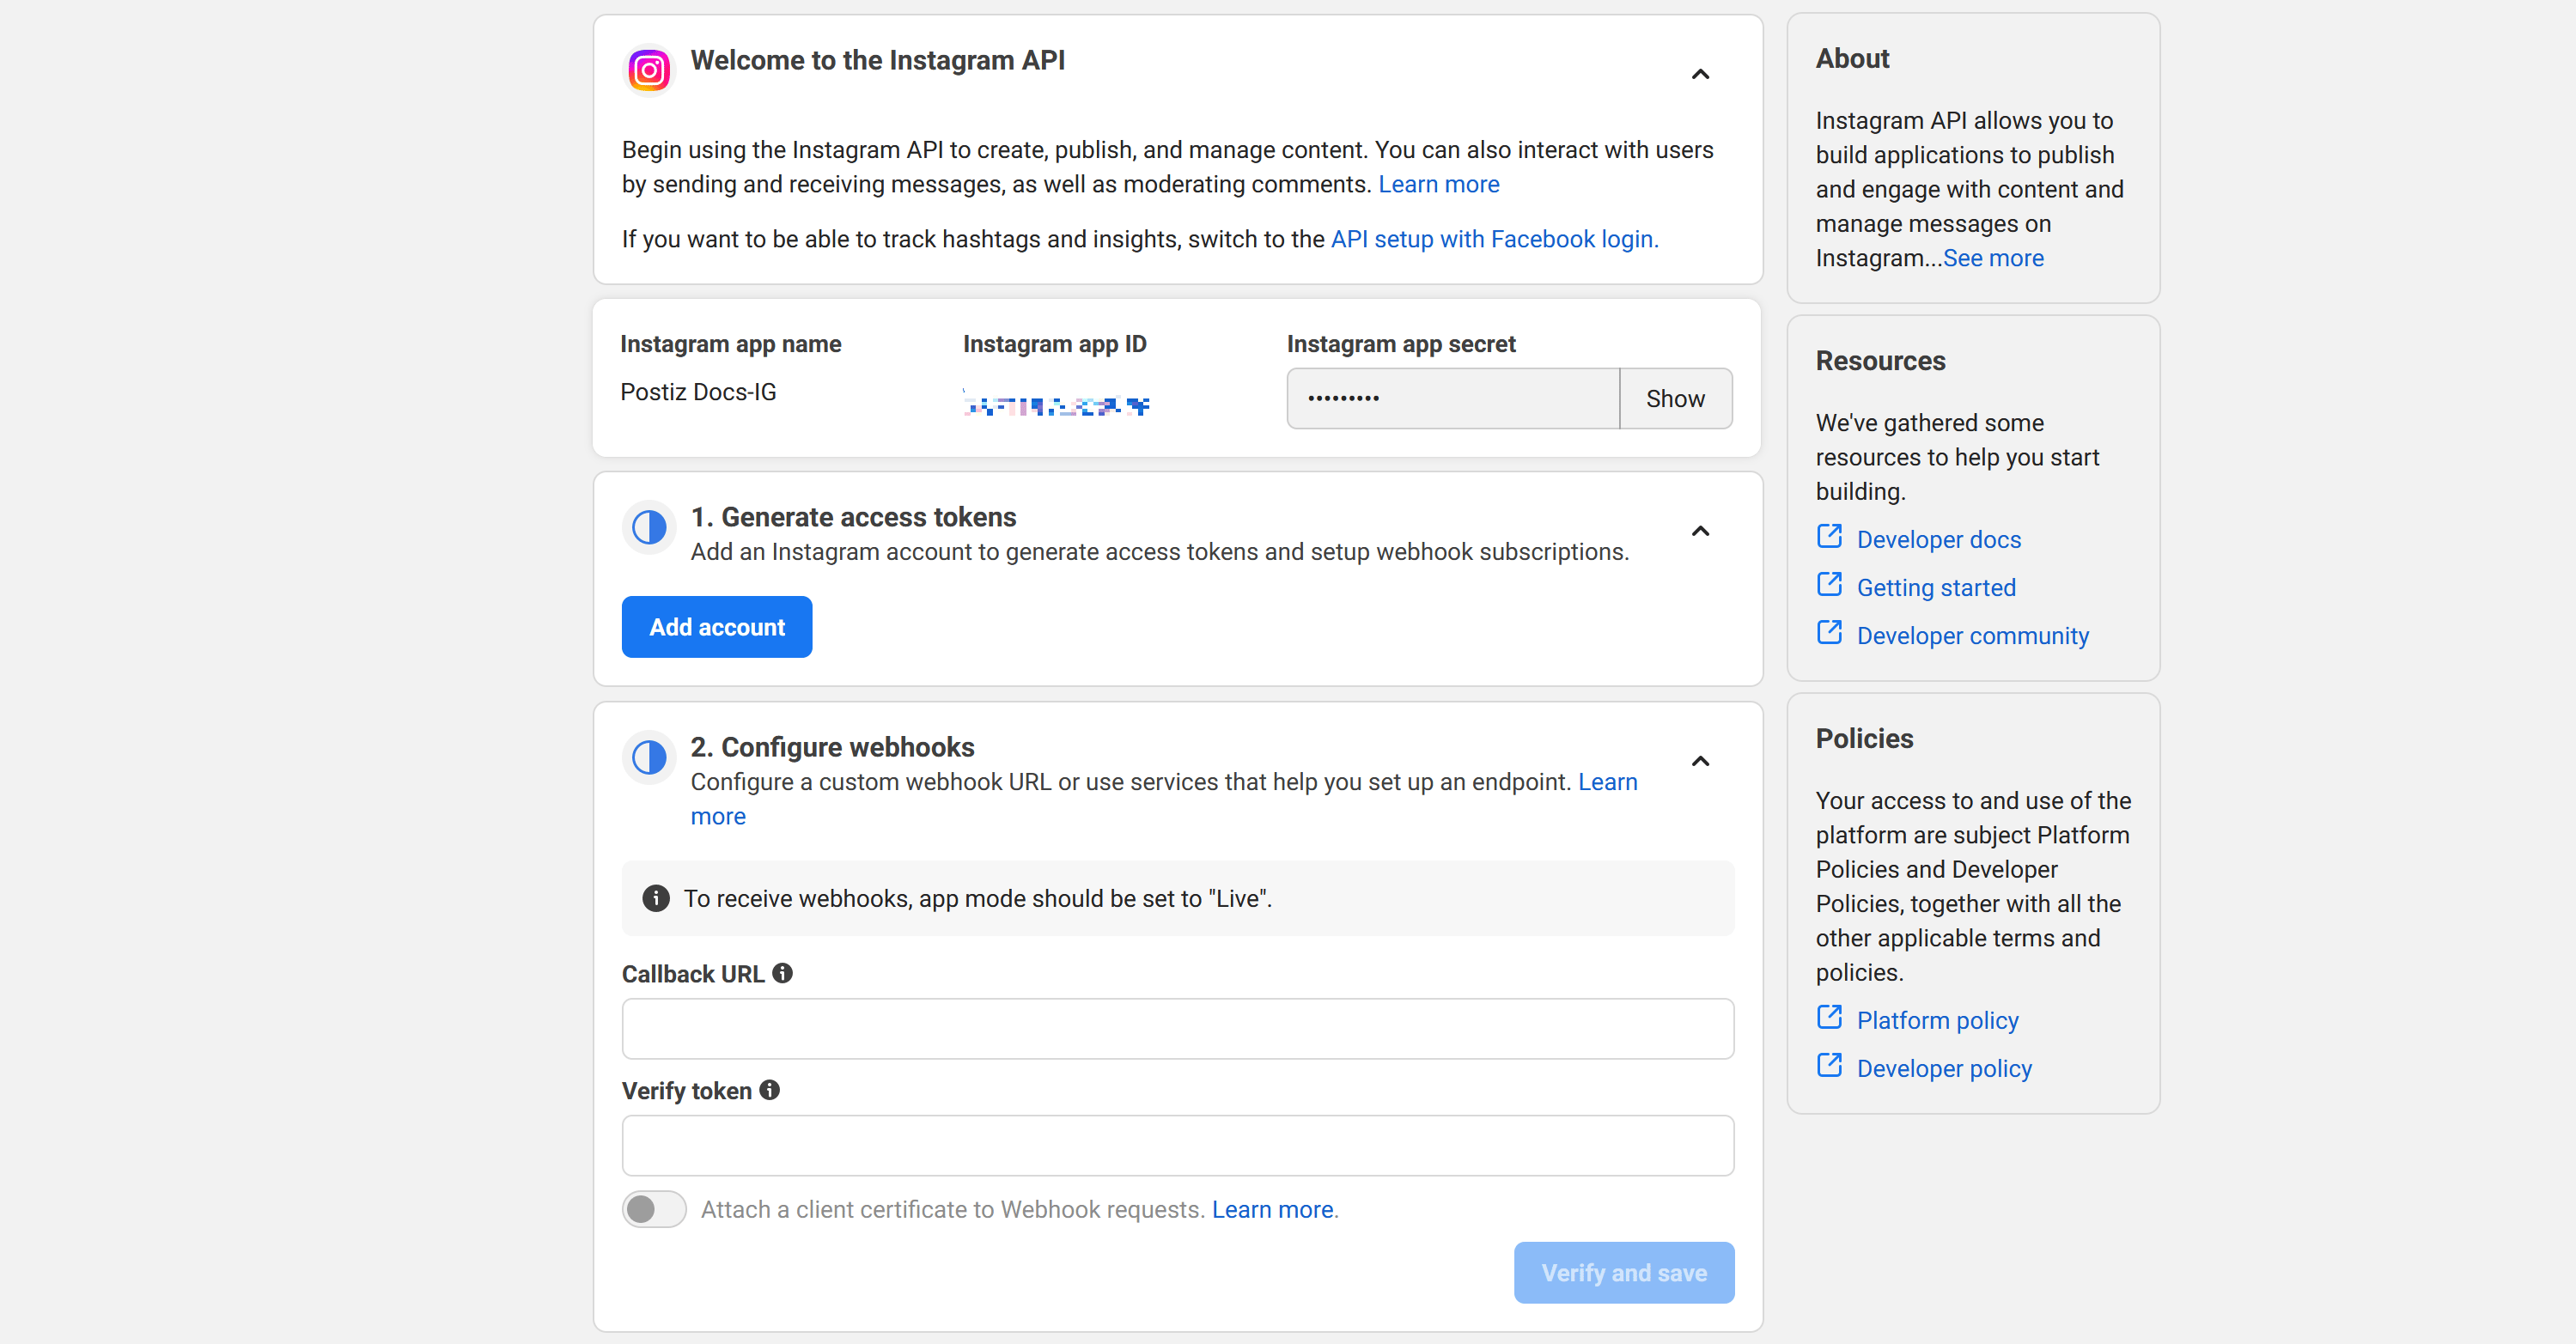 From your Instagram API setup screen copy the Instagram App ID and Instagram App Secret and paste them in your `.env` file
```env theme={"system"}
INSTAGRAM_APP_ID="app id"
INSTAGRAM_APP_SECRET="app secret"
```
Go to the PostQueen web interface, and click on the "Add Channel" button. Select "Instagram (Standalone)" from the list of available channels. You should be redirected to the Instagram login screen to authorize the application.
Approve all four permissions on that screen. If the granted list comes back short, she stops before the channel is created and says `Not enough scopes, when choosing a provider, please add all the scopes`.
## Adding App Roles
If you are having trouble connecting to your Instagram accounts, adding them as App Roles may help.
From your Instagram API setup screen copy the Instagram App ID and Instagram App Secret and paste them in your `.env` file
```env theme={"system"}
INSTAGRAM_APP_ID="app id"
INSTAGRAM_APP_SECRET="app secret"
```
Go to the PostQueen web interface, and click on the "Add Channel" button. Select "Instagram (Standalone)" from the list of available channels. You should be redirected to the Instagram login screen to authorize the application.
Approve all four permissions on that screen. If the granted list comes back short, she stops before the channel is created and says `Not enough scopes, when choosing a provider, please add all the scopes`.
## Adding App Roles
If you are having trouble connecting to your Instagram accounts, adding them as App Roles may help.
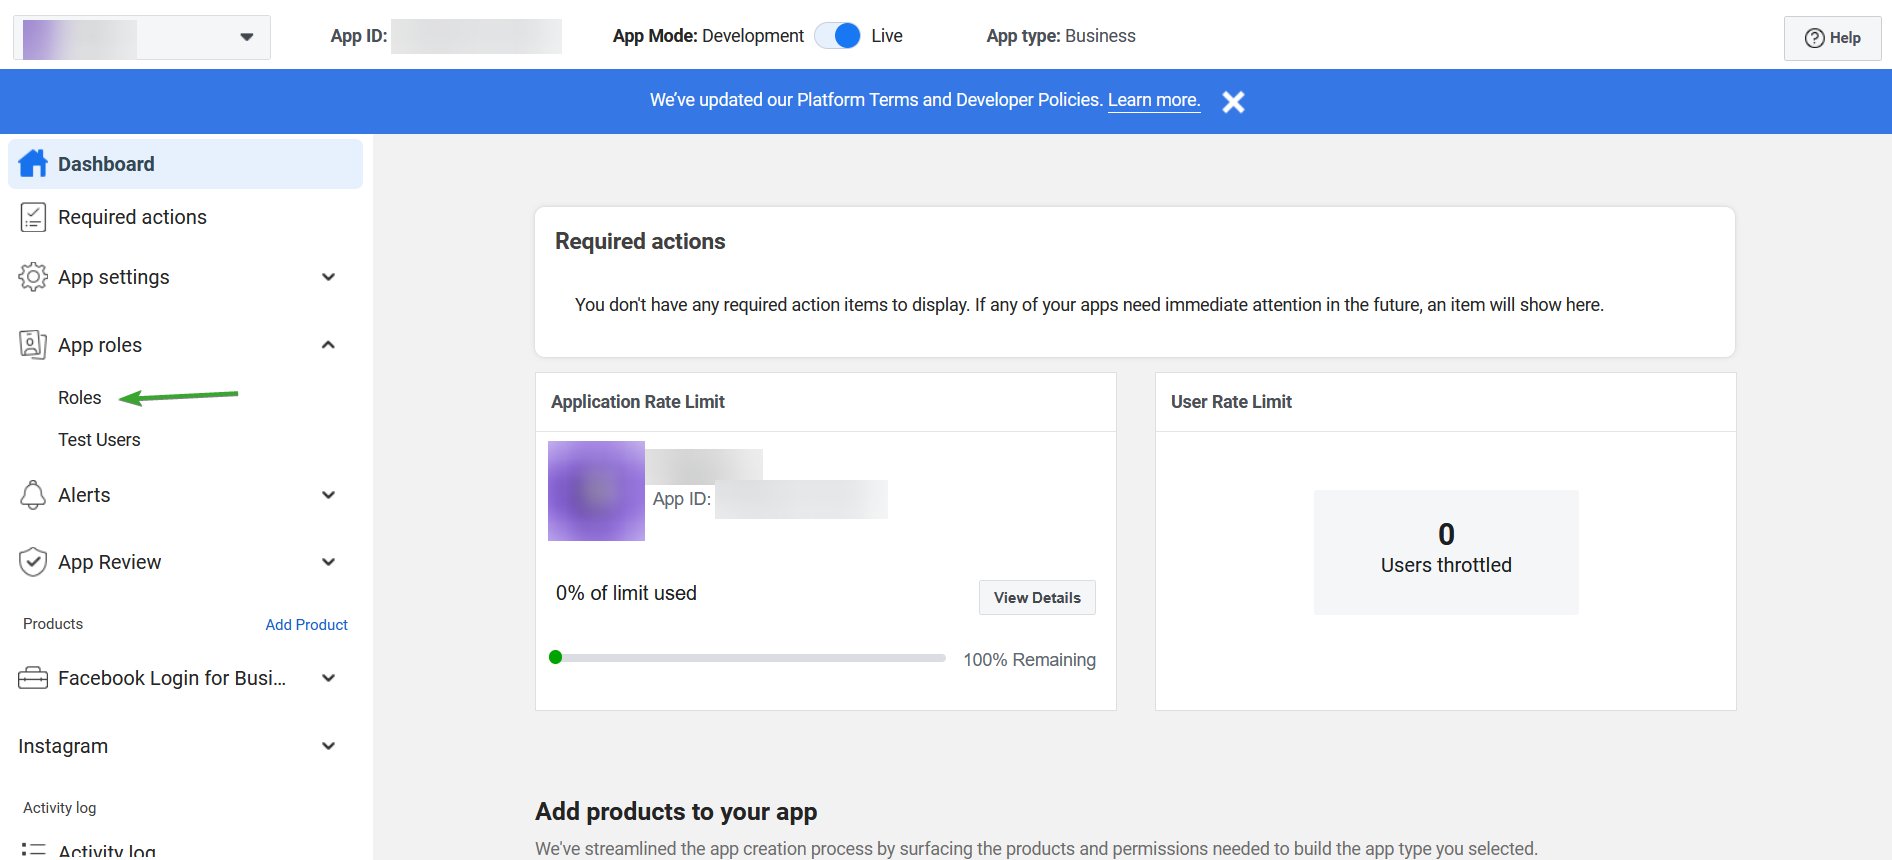 Click on "Add People"
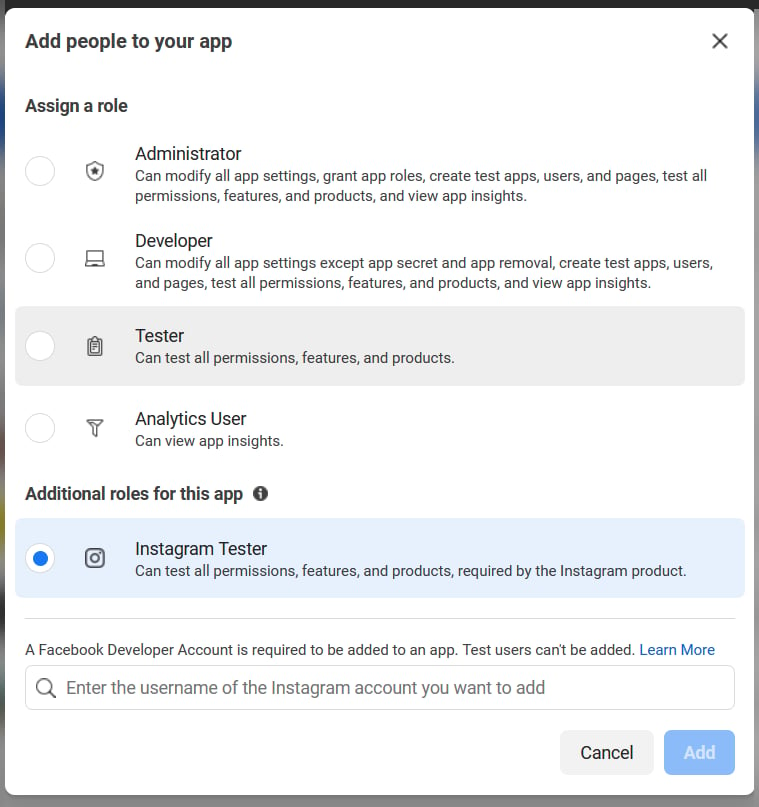
 Select the "Instagram Tester" option, and type in the handles of all the Instagram accounts you would like to connect to. Then, click "Add".
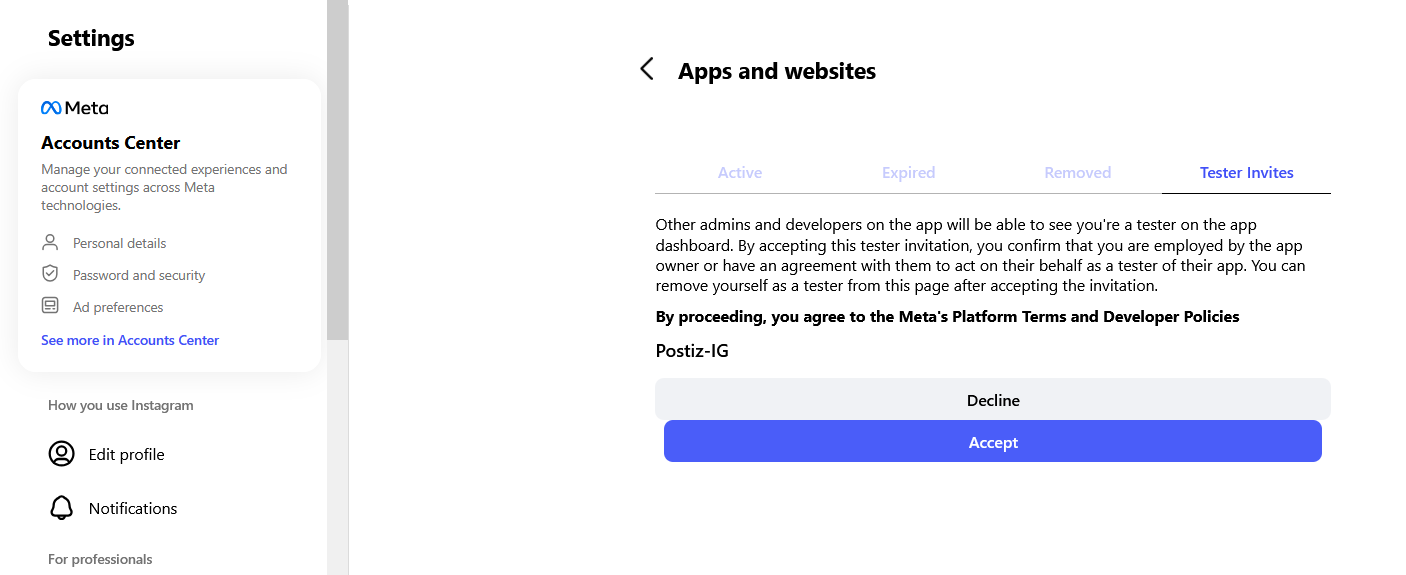
 Go to your Instagram account, and accept the tester invitation in the [Apps and Websites section of the profile settings](https://www.instagram.com/accounts/manage_access/).
 The channel is in the left sidebar with its avatar and name. That is the whole confirmation: if it is in the list, she can post to it.
## Troubleshooting
### "Insufficient developer role" error
This means the Instagram account you are trying to connect has not been added as a tester on the Meta app. Walk through the [Adding App Roles](#adding-app-roles) section above for that exact account: add it as an Instagram Tester, then accept the invitation from within the Instagram app's settings.
### Channel connects, but posts fail with permission errors
The advanced permissions on the Meta app must be approved (or your account must be a developer/tester on the app). Submit the app for review with the required scopes. Until then, only roles you have added can publish.
## Next steps
Limits, post types and settings
Every variable she reads
Invalid state, invalid\_grant and the rest
Every network, and what each one asks for
The channel is in the left sidebar with its avatar and name. That is the whole confirmation: if it is in the list, she can post to it.
## Troubleshooting
### "Insufficient developer role" error
This means the Instagram account you are trying to connect has not been added as a tester on the Meta app. Walk through the [Adding App Roles](#adding-app-roles) section above for that exact account: add it as an Instagram Tester, then accept the invitation from within the Instagram app's settings.
### Channel connects, but posts fail with permission errors
The advanced permissions on the Meta app must be approved (or your account must be a developer/tester on the app). Submit the app for review with the required scopes. Until then, only roles you have added can publish.
## Next steps
Limits, post types and settings
Every variable she reads
Invalid state, invalid\_grant and the rest
Every network, and what each one asks for