> ## Documentation Index
> Fetch the complete documentation index at: https://docs.postqueen.ai/llms.txt
> Use this file to discover all available pages before exploring further.
# R2 Configuration
> How to use Cloudflare R2 for file storage
Cloudflare R2 stores your uploaded images and video outside the container, reachable over HTTPS.
Several networks fetch your media from a URL rather than accepting the file directly, and R2 is the
only workable option once you run more than one instance. It has a free tier that covers most
self-hosted installs.
The bucket itself does not have to be public. PostQueen can serve media from your own domain and
read it privately. That is decided in the **Decide where media is read from** step below, and it is
the choice on this page most worth reading twice.
Deciding whether you need it at all? [Uploads and Storage](/configuration/uploads) compares it with
the local disk. This page is the setup, start to finish.
Go to the [Cloudflare Dashboard](https://dash.cloudflare.com/r2/overview), and register if needed, then login.
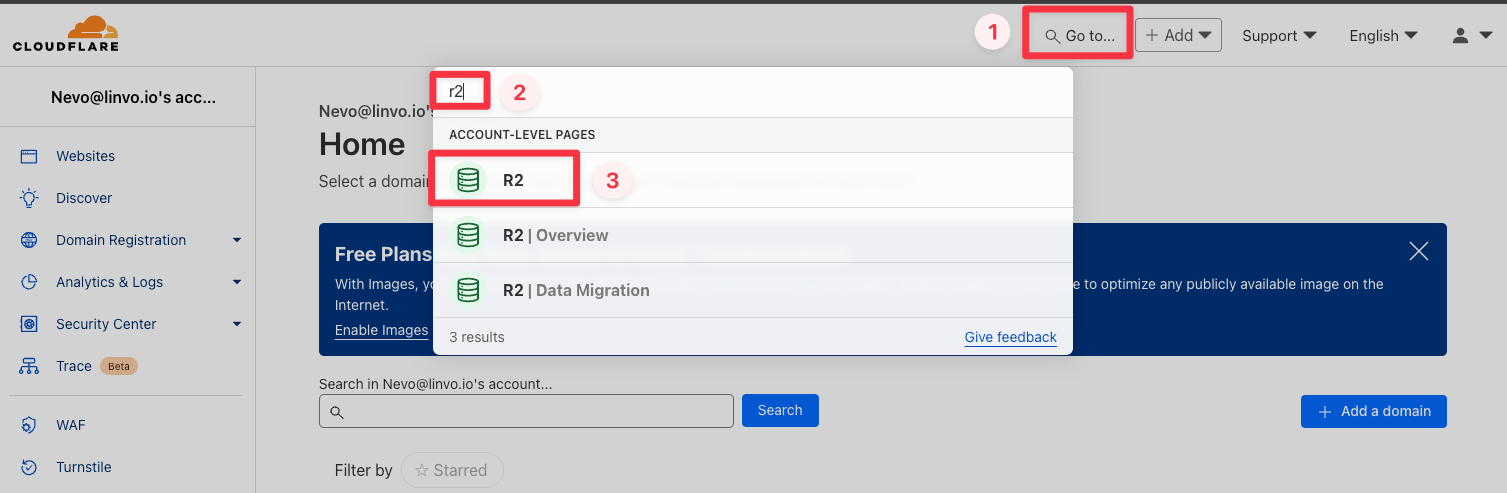
In the dashboard sidebar, head to the R2 page.
 Create a new Bucket.
* Choose Automatic
* Choose Standard
Create a new Bucket.
* Choose Automatic
* Choose Standard
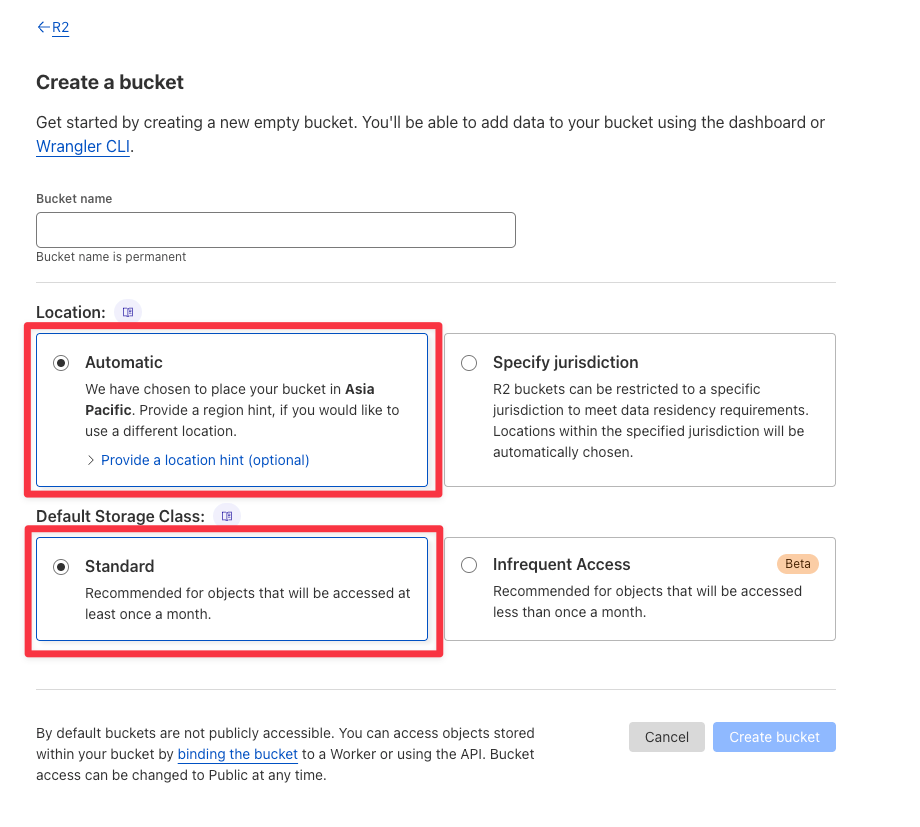 If you need your media to stay in a specific region for regulatory reasons,
an EU jurisdiction under GDPR for instance, pick it here, under
**Specify jurisdiction**. A location hint is a best-effort placement, not a
guarantee, and jurisdiction cannot be changed after the bucket exists.
Jurisdictional buckets also need `CLOUDFLARE_JURISDICTION` set below.
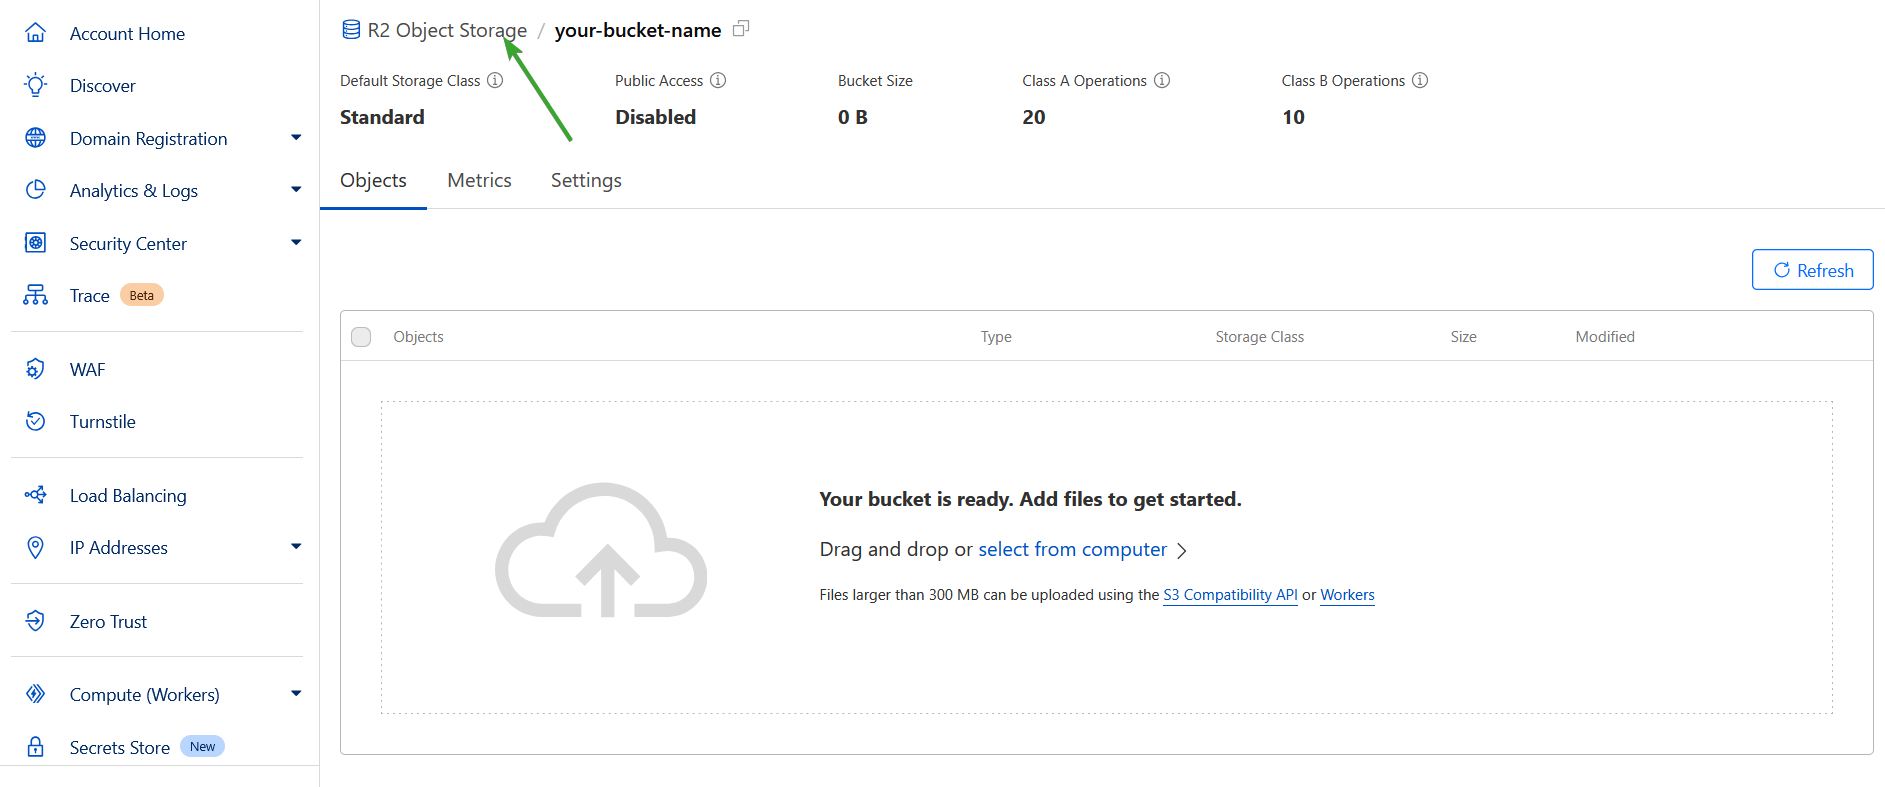
Create your R2 Token by going to R2 Object Storage:
If you need your media to stay in a specific region for regulatory reasons,
an EU jurisdiction under GDPR for instance, pick it here, under
**Specify jurisdiction**. A location hint is a best-effort placement, not a
guarantee, and jurisdiction cannot be changed after the bucket exists.
Jurisdictional buckets also need `CLOUDFLARE_JURISDICTION` set below.
Create your R2 Token by going to R2 Object Storage:
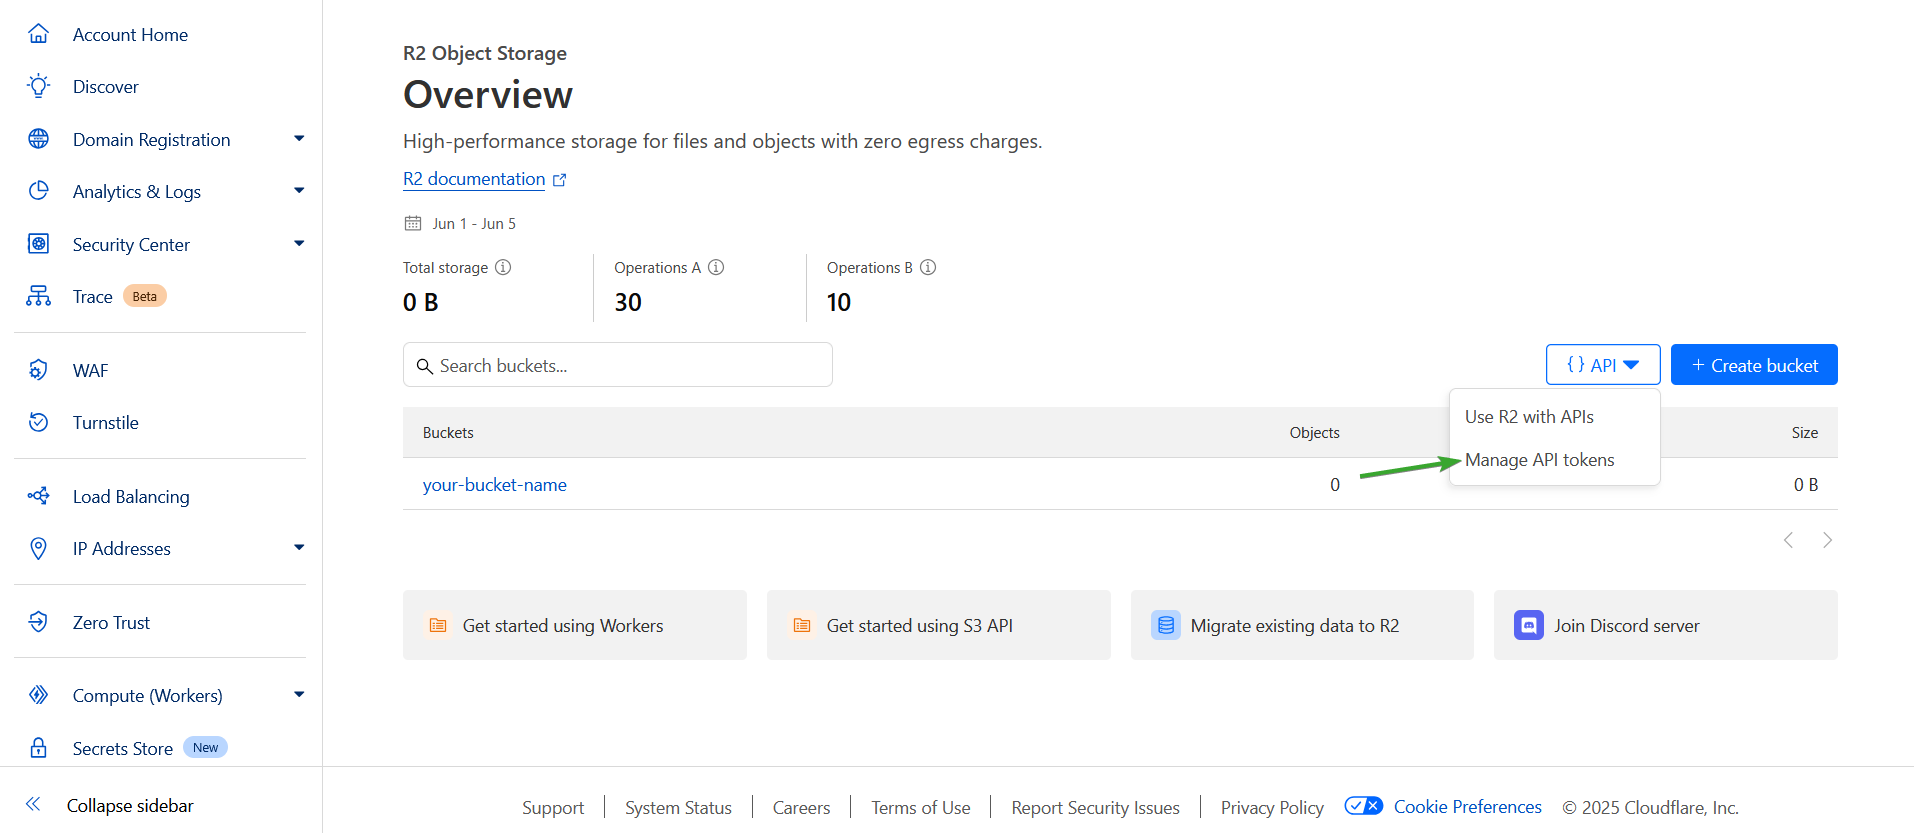
 Click on the API dropdown, and select [Manage API tokens](https://dash.cloudflare.com/?to=/:account/r2/api-tokens):
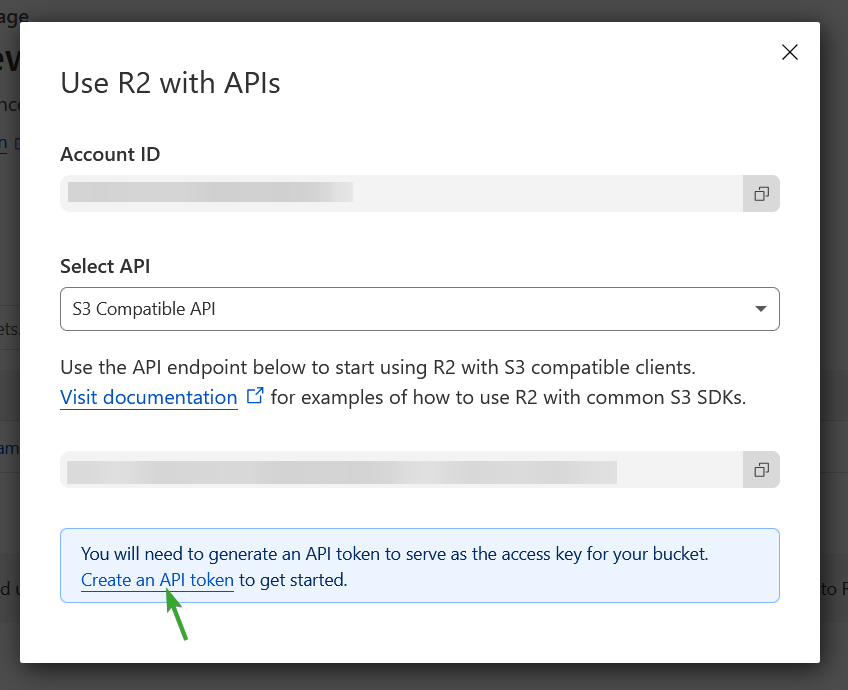
 Copy your Account ID for later, and click on "Create an API token":
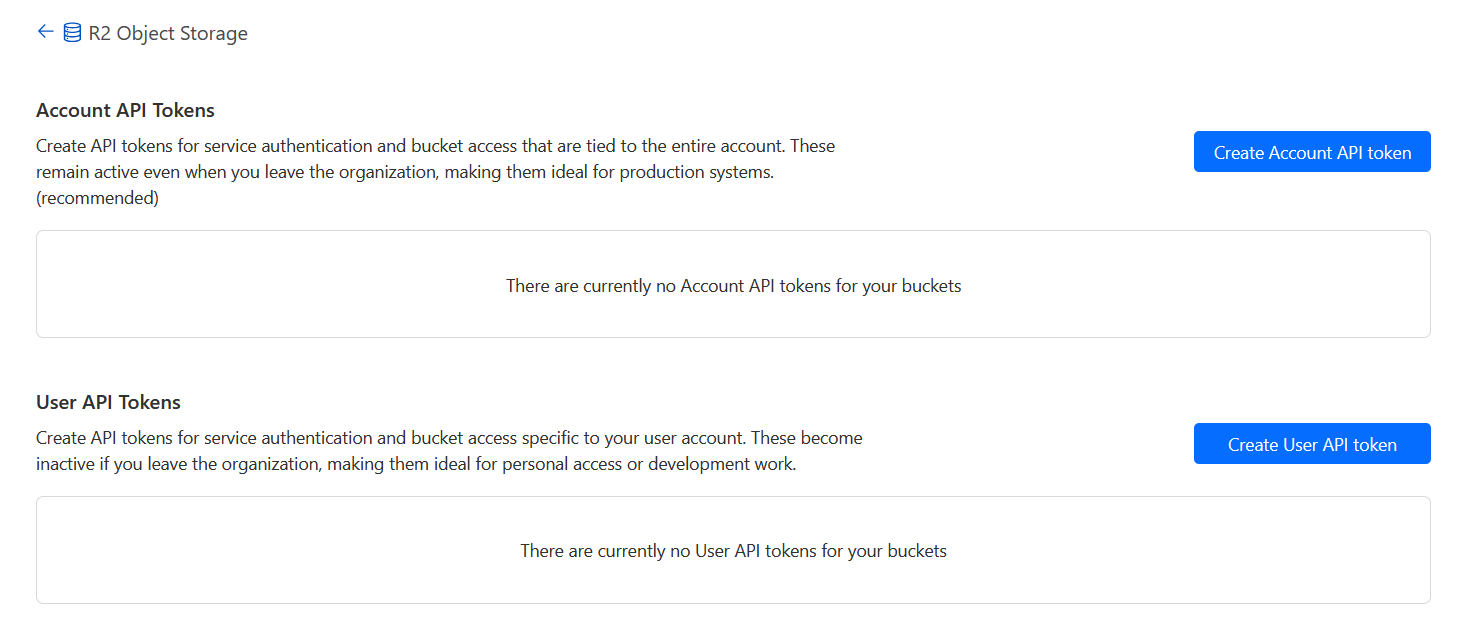
 Create an Account API token:
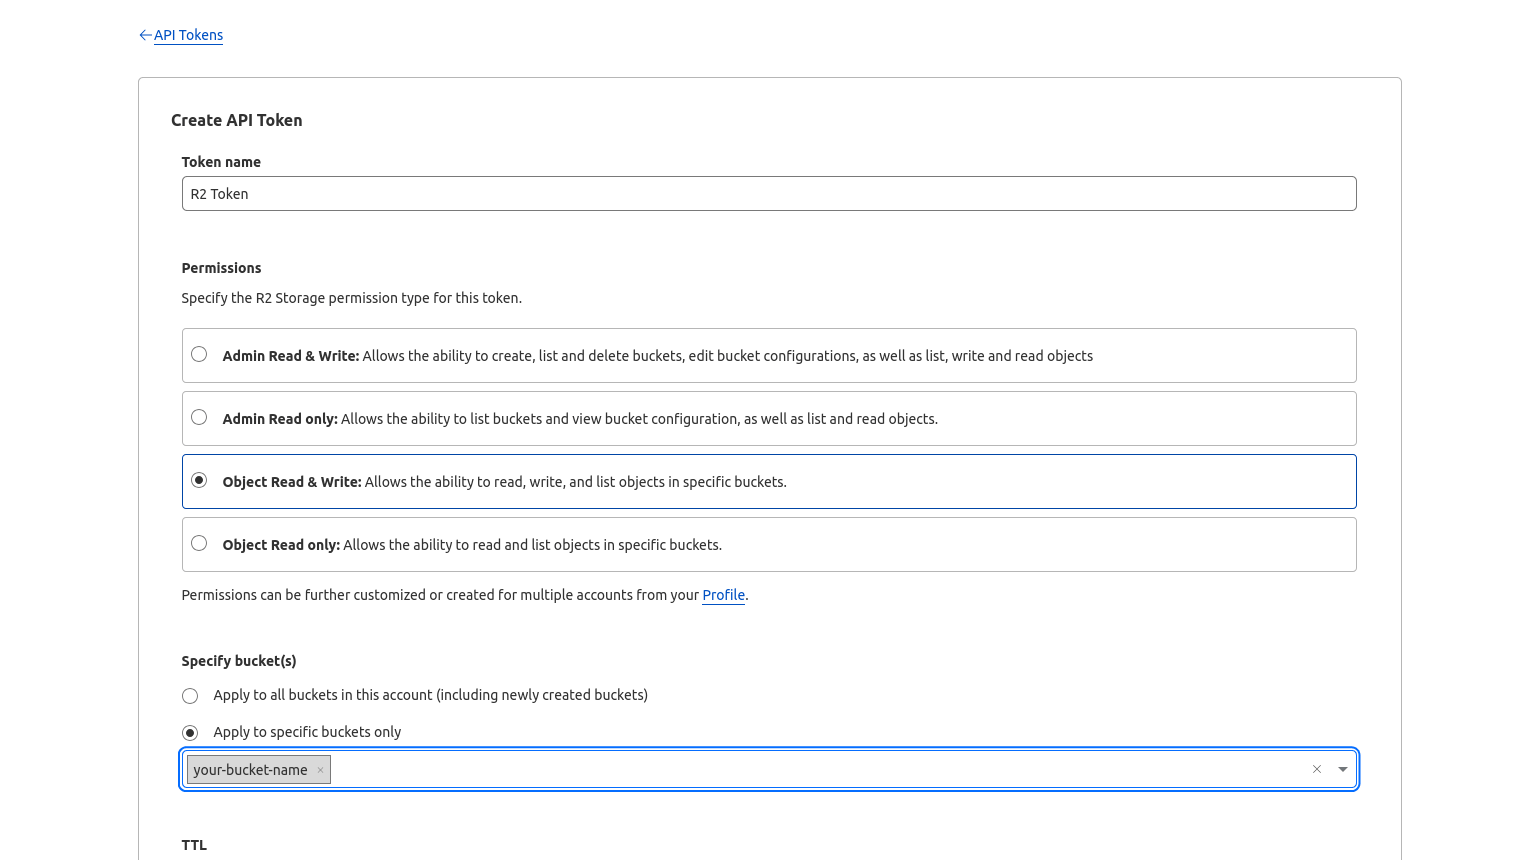
 Under "Permissions" choose "Object Read & Write" and under "Specify bucket(s)" search for your created Bucket.
 **Scope it to this bucket, not to the account.** "Apply to all buckets"
hands whatever holds this token the run of your R2 account, and this one
lives in an environment variable on a web server.
Should you later add a bucket for backups, give that its own token rather
than widening this one. The two jobs have no reason to share credentials,
and a backup tool has no business being able to delete the media it is
protecting.
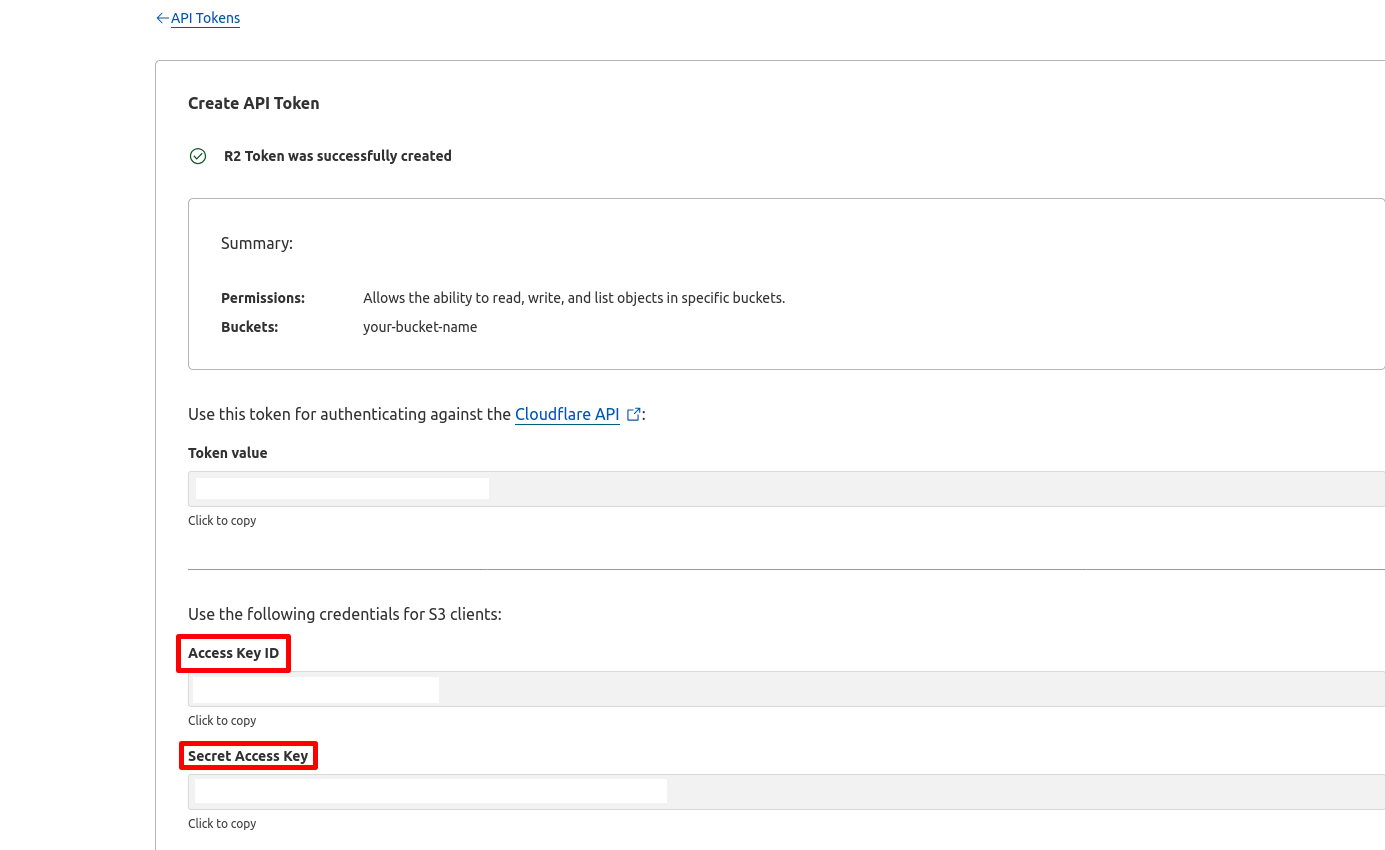
After the R2 Token is created, copy your "Access Key ID" and "Secret Access Key":
**Scope it to this bucket, not to the account.** "Apply to all buckets"
hands whatever holds this token the run of your R2 account, and this one
lives in an environment variable on a web server.
Should you later add a bucket for backups, give that its own token rather
than widening this one. The two jobs have no reason to share credentials,
and a backup tool has no business being able to delete the media it is
protecting.
After the R2 Token is created, copy your "Access Key ID" and "Secret Access Key":
 Paste the respective information into your configuration.
```env theme={"system"}
CLOUDFLARE_ACCOUNT_ID="your-account-id"
CLOUDFLARE_ACCESS_KEY="your-access-key-id"
CLOUDFLARE_SECRET_ACCESS_KEY="your-secret-access-key"
CLOUDFLARE_BUCKETNAME="your-bucket-name"
CLOUDFLARE_REGION="auto"
# Only for a bucket created with a jurisdiction, e.g. "eu"
CLOUDFLARE_JURISDICTION=""
```
Leave `CLOUDFLARE_REGION` as `auto` unless you deliberately pinned your bucket to one
location when you created it, in which case use that location hint instead.
`CLOUDFLARE_JURISDICTION` is separate from the region and only applies if you chose
**Specify jurisdiction** when creating the bucket. Such a bucket answers only on
`.eu.r2.cloudflarestorage.com`; left blank, the app queries the
account-wide endpoint and reports the bucket as missing.
`CLOUDFLARE_BUCKET_URL` is the address stored with every media row. It is
not only what your browser loads: **several networks fetch it with their
own servers** rather than accepting the file from you. Instagram and
Facebook take an `image_url`, and TikTok photo posts support nothing else.
So this address has to be reachable from the public internet, and it is
worth choosing deliberately.
| Option | Value | Trade |
| --------------------- | ------------------------------- | ------------------------------------------------------------------------------------------------------------------------------------------------------------------------------------------------- |
| **Through PostQueen** | `https://your-host/api/uploads` | Your own domain, no rate limit, and **the bucket can stay private**. Media leaves through your server, so it uses your bandwidth. |
| **Custom domain** | `https://cdn.example.com` | Fastest and cheapest, served by Cloudflare's edge, never touching your server. Requires the domain to be hosted at Cloudflare. |
| **r2.dev URL** | `https://pub-….r2.dev` | Works with no setup, but Cloudflare rate-limits it and documents it as unfit for production, and a network that asks you to verify the domain you serve from cannot verify one that is not yours. |
Whichever you pick, it must **not** be the S3 API endpoint
(`…r2.cloudflarestorage.com`). That address refuses unsigned reads, so every
image would break.
Serving through PostQueen needs nothing in Cloudflare, just the setting:
```env theme={"system"}
CLOUDFLARE_BUCKET_URL="https://your-host/api/uploads"
```
The `/api` prefix is required. Inside the container nginx maps `/uploads/`
to a local directory and only `/api/` reaches the backend.
For a custom domain, connect it to the bucket in the R2 settings and use it
instead:
```env theme={"system"}
CLOUDFLARE_BUCKET_URL="https://cdn.example.com"
```
Paste the respective information into your configuration.
```env theme={"system"}
CLOUDFLARE_ACCOUNT_ID="your-account-id"
CLOUDFLARE_ACCESS_KEY="your-access-key-id"
CLOUDFLARE_SECRET_ACCESS_KEY="your-secret-access-key"
CLOUDFLARE_BUCKETNAME="your-bucket-name"
CLOUDFLARE_REGION="auto"
# Only for a bucket created with a jurisdiction, e.g. "eu"
CLOUDFLARE_JURISDICTION=""
```
Leave `CLOUDFLARE_REGION` as `auto` unless you deliberately pinned your bucket to one
location when you created it, in which case use that location hint instead.
`CLOUDFLARE_JURISDICTION` is separate from the region and only applies if you chose
**Specify jurisdiction** when creating the bucket. Such a bucket answers only on
`.eu.r2.cloudflarestorage.com`; left blank, the app queries the
account-wide endpoint and reports the bucket as missing.
`CLOUDFLARE_BUCKET_URL` is the address stored with every media row. It is
not only what your browser loads: **several networks fetch it with their
own servers** rather than accepting the file from you. Instagram and
Facebook take an `image_url`, and TikTok photo posts support nothing else.
So this address has to be reachable from the public internet, and it is
worth choosing deliberately.
| Option | Value | Trade |
| --------------------- | ------------------------------- | ------------------------------------------------------------------------------------------------------------------------------------------------------------------------------------------------- |
| **Through PostQueen** | `https://your-host/api/uploads` | Your own domain, no rate limit, and **the bucket can stay private**. Media leaves through your server, so it uses your bandwidth. |
| **Custom domain** | `https://cdn.example.com` | Fastest and cheapest, served by Cloudflare's edge, never touching your server. Requires the domain to be hosted at Cloudflare. |
| **r2.dev URL** | `https://pub-….r2.dev` | Works with no setup, but Cloudflare rate-limits it and documents it as unfit for production, and a network that asks you to verify the domain you serve from cannot verify one that is not yours. |
Whichever you pick, it must **not** be the S3 API endpoint
(`…r2.cloudflarestorage.com`). That address refuses unsigned reads, so every
image would break.
Serving through PostQueen needs nothing in Cloudflare, just the setting:
```env theme={"system"}
CLOUDFLARE_BUCKET_URL="https://your-host/api/uploads"
```
The `/api` prefix is required. Inside the container nginx maps `/uploads/`
to a local directory and only `/api/` reaches the backend.
For a custom domain, connect it to the bucket in the R2 settings and use it
instead:
```env theme={"system"}
CLOUDFLARE_BUCKET_URL="https://cdn.example.com"
```
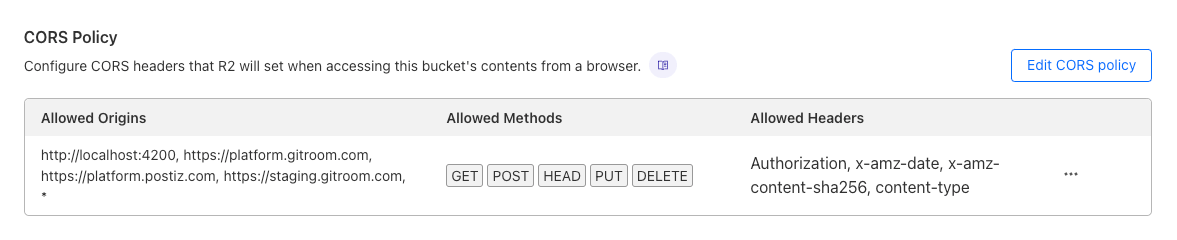
 By default the browser uploads to R2 itself, using a URL PostQueen signs for
it, and that is a cross-origin request the bucket has to allow.
If you run with [`UPLOAD_VIA_SERVER=true`](/configuration/uploads), skip this
step. The browser never talks to R2 in that mode, so no CORS policy applies.
Edit the CORS policy on the bucket and add the following, replacing the
origin with your own:
```json theme={"system"}
[
{
"AllowedOrigins": [
"http://localhost:4200",
"https://postqueen.example.com"
],
"AllowedMethods": [
"GET",
"POST",
"HEAD",
"PUT",
"DELETE"
],
"AllowedHeaders": [
"Authorization",
"x-amz-date",
"x-amz-content-sha256",
"content-type"
],
"ExposeHeaders": [
"ETag",
"Location"
],
"MaxAgeSeconds": 3600
}
]
```
`ExposeHeaders` is not decoration: a multipart upload needs the browser to
read each part's `ETag`, and it cannot without this.
By default the browser uploads to R2 itself, using a URL PostQueen signs for
it, and that is a cross-origin request the bucket has to allow.
If you run with [`UPLOAD_VIA_SERVER=true`](/configuration/uploads), skip this
step. The browser never talks to R2 in that mode, so no CORS policy applies.
Edit the CORS policy on the bucket and add the following, replacing the
origin with your own:
```json theme={"system"}
[
{
"AllowedOrigins": [
"http://localhost:4200",
"https://postqueen.example.com"
],
"AllowedMethods": [
"GET",
"POST",
"HEAD",
"PUT",
"DELETE"
],
"AllowedHeaders": [
"Authorization",
"x-amz-date",
"x-amz-content-sha256",
"content-type"
],
"ExposeHeaders": [
"ETag",
"Location"
],
"MaxAgeSeconds": 3600
}
]
```
`ExposeHeaders` is not decoration: a multipart upload needs the browser to
read each part's `ETag`, and it cannot without this.
 Credentials, a bucket URL and, where the browser uploads directly, a CORS policy are the whole of
the R2 setup. Point `STORAGE_PROVIDER` at `cloudflare` in
[Uploads and Storage](/configuration/uploads) and new media goes to the bucket.
## Backing the bucket up
Media that lives in R2 is no longer in a Docker volume, so a volume backup does
not include it. [Backups and Upgrades](/installation/backups-and-upgrades)
covers what that changes.
Give the backup its own R2 token rather than reusing the application's. It needs
to write to wherever backups go and to read the media bucket, nothing more. In
particular it has no reason to be able to delete the media it exists to protect.
## Unfinished uploads
A multipart upload that never completes leaves its parts in the bucket. They
appear in no object listing and are still stored, so it is the kind of thing
that grows quietly.
Cloudflare adds a default lifecycle rule to every bucket that aborts them after
seven days, visible under **Settings → Object lifecycle rules**. Nothing to set
up; worth knowing it is what keeps an interrupted upload from costing you
indefinitely.
## Next steps
Local disk against R2, the 1 GB limit, and what `UPLOAD_VIA_SERVER` changes
Payload limits, the formats that cannot be fetched from a URL, and cancel-in-flight
Which volumes carry real data once your media has moved out of them
Every environment variable she reads, including the `CLOUDFLARE_` set
Credentials, a bucket URL and, where the browser uploads directly, a CORS policy are the whole of
the R2 setup. Point `STORAGE_PROVIDER` at `cloudflare` in
[Uploads and Storage](/configuration/uploads) and new media goes to the bucket.
## Backing the bucket up
Media that lives in R2 is no longer in a Docker volume, so a volume backup does
not include it. [Backups and Upgrades](/installation/backups-and-upgrades)
covers what that changes.
Give the backup its own R2 token rather than reusing the application's. It needs
to write to wherever backups go and to read the media bucket, nothing more. In
particular it has no reason to be able to delete the media it exists to protect.
## Unfinished uploads
A multipart upload that never completes leaves its parts in the bucket. They
appear in no object listing and are still stored, so it is the kind of thing
that grows quietly.
Cloudflare adds a default lifecycle rule to every bucket that aborts them after
seven days, visible under **Settings → Object lifecycle rules**. Nothing to set
up; worth knowing it is what keeps an interrupted upload from costing you
indefinitely.
## Next steps
Local disk against R2, the 1 GB limit, and what `UPLOAD_VIA_SERVER` changes
Payload limits, the formats that cannot be fetched from a URL, and cancel-in-flight
Which volumes carry real data once your media has moved out of them
Every environment variable she reads, including the `CLOUDFLARE_` set